Learn how to make a sweet and simple baby quilt that’s perfect for beginners!
This Early Bird Baby Quilt comes together with easy strip piecing, a touch of applique, and just enough patchwork to keep it fun without being overwhelming.
Whether it’s your first quilt or you’re just looking for a quick weekend project, this one is a great choice.
Plus, it’s charm-pack and scrap-friendly, so you can use what you have and make it totally your own!
This sweet little quilt is perfect for beginners—simple piecing, a touch of applique, and a finished size that’s just right for snuggling or displaying.

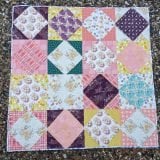
Today I am sharing a quick quilt that you can use for either a baby quilt or wall hanging. The applique uses the heatnbond lite and features a little bird. It’s sweet and fresh and reminds me of cool nights and a little breeze.

Finished Size: 37″ x 37″
Everyone loves a little quilt to snuggle their babies in. The size isn’t huge, so it fits small ones just right….or you can lay it on the floor for some fun belly time. Right now though I don’t have any little wee ones in the home so this quilt is hanging on the wall. It’s the perfect size for that too!
The center of the patchwork quilt blocks features a little bird. It’s from another pattern– we love to reuse our templates around here! If you’d like though you can switch it up with another applique. Think of something around 6″ square and you should be fine.
Purchase The Pdf Pattern Here: Early Bird Quilt Pattern
Materials Needed:
- Heatnbond® Lite Fusible
- bird template (included in the pattern)
- fat quarters of 5-6 different fabrics for the patchwork
- 1 fat quarter for the center blocks (behind the applique)
- white fabric sashing– 1/4 yard
- first border- 1/8 yard
- second border- 1/4 yard
- Fabric: Coordinating fabric and optional scraps
- Tools: Rotary cutter, cutting mat, ruler, sewing machine
- Thread: Matching or contrasting
- Extras: Pins, iron, marking tools (optional)

~ Early Bird Baby Quilt Tutorial ~
1) Cut fat quarter pieces into 2 1/2″ X 14″ you will need a total of 16 strips
2) Sew 4 — 2 1/2″ strips together
3) Cut into 3 1/2″ sections– you will need a total of 16 (4 per quilt block)

4) Cut 8– 4″ X 4″ background squares and 8– 4″ X 4″ out of the fat quarter fabrics
5) Lay right sides together the 4″ X 4″ squares- one background, one color
6) Draw a line down the center from corner to corner- sew 1/4″ seam on either side of the line
7) Cut on the drawn line and square up the half square triangles to measure 3 1/2″ X 3 1/2″
8) Cut 4— 8 1/2″ X 8 1/2″ out of the fat quarter for the center block
9) Cut 4– 3 1/2″ X 3 1/2″ squares out of the fat quarter fabrics– draw a line from corner to corner on the wrong side of fabric
10) Lay one 3 1/2″ square in the corner of the 8 1/2″ square
11) Sew on the drawn line– if you’d like to you can sew 1 /2″ from the sewn line for an extra free half square triangle to use on another project
12) Trim on the drawn line and iron open

13) Sew one 3 1/2″ section to opposite sides of the center square

14) Sew one half square triangle to either end of a 3 1/2″ section

15) Sew to opposite sides of the center square
16) Cut 2– 2″ X 14 1/2″ strips for sashing
17) Sew the sashing strips to one side of the block- repeat with a second block
18) Sew another block to the side of the sashing strip
19) Cut 1– 2″ X 31 1/2″ strip for sashing
20) Sew the sashing to the top of one block section

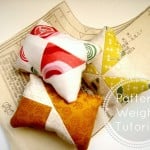
21) Trace the bird applique template on the Heatnbond® Lite Fusible. Follow the instructions and fuse to your fabric. Cut out shapes and fuse to the center of the quilt blocks.
– Applique The Bird –
- Trace the bird template onto the paper side of HeatnBond® Lite.
- Fuse to the wrong side of your chosen fabric.
- Cut out the bird shape.
- Position the applique on the center of the quilt and fuse in place.
- Stitch around the edges using a buttonhole or zigzag stitch.

22) Stitch around the outside of the applique with a button hole or a zig zag stitch

23) Cut the first border strips 2– 1 1/2″ X 31 1/2″ and 2– 1 1/2″ X 32″
24) Sew the first border strips to the sides of the quilt center
25) Cut the second border strips 2– 3″ X 32″ and 2– 3″ X 37″
26) Sew the second border strips to the sides of the quilt center
27) Layer your quilt top, batting and backing. Quilt as desired.


Purchase The Pdf Pattern
{Finishing The Quilt}
1. Cut or piece together your batting and a piece of quilt backing fabric.
2. Make a quilt sandwich with the backing, batting, and top.
3. Baste together with fusible batting, pins or basting spray.
3. Quilt as desired. A few of my favorite ways to quilt are Straight line quilting or cross hatch quilting. Use a walking foot on your sewing machine. Trim away the extra batting and backing.
4. Cut strips of fabric for the binding. Cut 2 1/2” tall (sometimes I use 2 1/4″) binding strips. Sew the binding strips together and bind using your favorite technique.
+ Tips for Beginners +
1. Keep it scrappy!
You don’t need perfectly coordinated fabric. Using leftover pieces or charm squares adds character—and it’s a great way to use what you’ve got.
2. Double check your seam allowance.
A consistent ¼” seam allowance keeps everything lining up nicely. If you’re not sure, test it on a scrap first before you dive in.
3. Press as you go.
Press each seam after you sew it (don’t skip this!). It helps your quilt stay flat and your blocks stay the right size.
4. Trim those blocks.
If your half-square triangles are a bit wonky, trim them to size before sewing them into your block. It’s worth the few extra minutes.
5. Applique doesn’t have to be fancy.
If you’re new to applique, use a zigzag or buttonhole stitch around the edge—or just a straight stitch close to the raw edge works fine, too.
6. Quilt simply.
Straight lines are your friend. You don’t need fancy quilting—stitching in the ditch or diagonal lines through the blocks looks great and is beginner-friendly.
7. Use safety pins or spray to baste.
Choose whichever basting method feels easiest. Just make sure your quilt sandwich doesn’t shift while quilting.
8. Binding can be basic.
If traditional binding feels intimidating, try using the backing fabric as your binding. Fold it over to the front and stitch it down—it looks great and saves time.
9. Don’t worry about perfection.
Seriously. If your points don’t match or your seams are a little off, it’s still a quilt and it’s still beautiful.
10. Have fun and take breaks.
There’s no race. Enjoy the process, stretch your legs, grab a snack, and come back when you’re ready to keep going.
Additional Baby Quilt Patterns:
- Baby Eye Spy Quilt Pattern
- Baby Quilts for Girls
- 20 Baby Quilts for Beginners
- Super Cute Baby Quilts to Make
- Charm Blossom Baby Quilt Pattern
- Dresden Garden Baby Quilt Tutorial
- 25+ Easy Baby Quilts to Make in a Day
- Zippy Baby Quilt with Applique Tutorial
- Disappearing 4 Patch – Baby Quilt Tutorial
Frequently Asked Questions
+ What is the finished size of the Early Bird Baby Quilt?
The quilt finishes at 37″ x 37″, making it ideal for a baby blanket, tummy time mat, or wall hanging.
+ Is this pattern suitable for beginners?
Yes! The tutorial incorporates straightforward strip piecing, simple half-square triangles, and a basic applique, making it accessible for those new to quilting.
+ Can I customize the bird applique?
Absolutely! While the pattern includes a bird template, you can substitute it with any applique design approximately 6″ square to personalize your quilt.
+ What quilting techniques are recommended for finishing the quilt?
The tutorial suggests straight-line or crosshatch quilting using a walking foot. After quilting, trim the excess batting and backing, then bind the quilt using your preferred method.
+ Is there a printable version of the pattern available?
Yes, a PDF version of the Early Bird Baby Quilt Pattern is available for purchase, which includes the bird applique template and detailed instructions.