Turn a charming vintage tin into the cutest little pincushion—both functional and fabulous—with this quick and delightful DIY you’ll want to make again and again!
Whether you’re using a leftover quilt block or a scrap of your favorite fabric, this quick make is a wonderful way to breathe new life into treasured materials.
Ideal for gifts, craft fair items, or your own sewing space, this tin pincushion adds both beauty and practicality to your sewing toolkit.

Helpful Tips:
- Use a thicker thread (like quilting or button thread) for gathering to avoid breakage.
- A glue gun with a fine-tip nozzle allows more control, especially on smaller tins.
- If your tin is deep, add extra stuffing or place a small fabric-covered cardboard disc at the base to elevate the cushion.
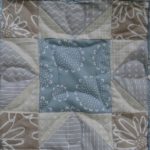
- For a coordinated look, use a matching or contrasting fabric circle cut from leftover quilt blocks.
Optional Embellishments:
- Add a ribbon or lace trim around the fabric edge.
- Stitch a few decorative buttons or embroidery details onto the top before gathering.
- Use wool roving instead of polyfill if you prefer a firmer cushion.

This little pincushion is all about charm and simplicity. You’re taking a leftover quilt block or fabric scrap and turning it into something functional—and totally adorable.
The best part? There’s no exact measurement required here. Because tins come in all shapes and sizes, this is a wonderfully flexible project.
You’ll just trim your circle to fit, stuff it snug, and glue it in. It’s that easy.
This is a great project for anyone who wants a quick win—perfect for last-minute gifts, swaps, or even stocking stuffers. The hand-gathered top adds a soft, vintage touch, and the tin gives it structure and personality.
Whether your tin is shiny, rusty, or a little bit dented, it all adds to the story.
Don’t worry if your circle doesn’t look perfect once it’s gathered. That little pouf of batting will smooth everything out, and once it’s tucked into the tin, it’s like magic.
If your fabric is thin or a bit see-through, consider adding a layer of muslin or batting behind it before gathering.
You can even personalize it further—add a bit of ribbon around the edge, a button in the center, or tuck in a tiny tag or charm to make it your own.
Once you make one, you’ll probably want to make more. It’s that kind of project.
Tin Pincushion Instructions
Materials Needed:
- 1 vintage tin (such as a small jello mold)
- 1 fabric circle (approximately 1.5″–2″ larger in diameter than the tin opening)
- Polyester fiberfill or batting
- Hand sewing needle and strong thread
- Hot glue gun and glue stick
Instructions:
Prepare the Fabric:
Cut a circle from your fabric approximately 1.5″ to 2″ larger than the diameter of your tin.
This allows room for gathering and stuffing.

Sew a Gathering Stitch:
Using a hand sewing needle, stitch a running stitch around the outer edge of the fabric circle, approximately ⅛” from the edge.
Leave long thread tails at the start and end.


Add Stuffing:

Place a generous amount of stuffing in the center of the fabric circle.

Begin gently pulling the thread tails to gather the fabric edges around the stuffing.

Adjust and add more stuffing as needed to create a firm, dome-shaped cushion that will fit snugly inside the tin.
Secure the Shape:

Once the desired fullness is achieved and the gathered edge is tight, tie off the thread securely with a knot.
Tuck in any raw edges if needed to neaten the bottom.
Attach to Tin:
Apply a generous bead of hot glue around the inner base of the tin.
Quickly press the gathered side of the fabric ball into the glue, centering it in the tin. Hold in place until the glue sets.
Finish:
Allow glue to cool and set completely before use.
Your pincushion is now ready to hold pins and needles.

Repurposing a vintage tin into a pincushion is not only a creative reuse project but also a meaningful way to preserve little pieces of your sewing history.

More help –
- Different stuffing options for your pin cushions
- 20 free pin cushions
- Cute pins for your pin cushions
Other fun pin cushion patterns:

Make a pin cushion for your sewing machine – no more needles rolling around.

Doily topped pin cushion – great for those super cute doilies

These felted wool strip pin cushions are great for using your leftover wool – or parts of a shrunk sweater.

Learn a little EPP (english paper piecing) with this fun hexagon pincushion

Make a pin cushion for your couch arm – perfect for evening sewing