

Learn how to sew a Disappearing 16 patch quilt block. You will end up with 2 finished quilt blocks! Super fun and easy to sew.
I am really starting to like the disappearing quilt blocks. They are so fun and exciting! You never really know what they will end up like in the end. After you sew them and cut them up you then get to play with the layout.
It’s so much fun to see the different combinations there are! Especially if you use a lot of fabric like your scraps. These are perfect for those.
For the Disappearing 16 patch, it was no different from the other blocks…except that you get 2 finished blocks out of the one 16 patch that you sew! Double the pleasure!

Materials Needed:
- Squares random, scrappy squares. You can decide what size to use, just make sure they are all the same – (16 of these)
- Fabric: Coordinating fabric and optional scraps
- Tools: Rotary cutter, cutting mat, ruler, sewing machine
- Thread: Matching or contrasting
- Extras: Pins, iron, marking tools (optional)
16 Patch Quilt Block Instructions:
1) Lay the squares out and play with their placement. I went with a Bargello style of block.

2) Sew all the blocks together to make a 16 patch

3) Take your ruler and line it up -corner to corner. Cut on the line. Make sure you are cutting at each point on the blocks

4) Without moving the quilt block, line up the ruler again- corner to corner and cut

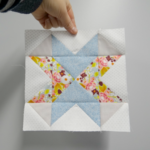
5) Make a pile with your new formed triangles and start matching them up. You will have some fun coming up with the combinations!

6) Repeat with the remaining triangles. You will end up with 2 finished quilt blocks for every 1 large 16 patch quilt block.
Here are some different combinations I came up with for my new 2 blocks.

In the example I used only 4 fabrics, feel free to mix them up and use a bunch! The outcome will be different each time.

Disappearing Quilt Blocks & Patterns eBook-
/**/

Have you used this method before? What did you find was the most successful?

~ More Disappearing Quilt Block Tutorials ~
- 15+ Disappearing Quilt Patterns
- Disappearing Quilt Blocks and Patterns
- Disappearing Quilt Blocks – Row Along
- Disappearing 4 Patch Quilt Block Tutorial
- Disappearing Pinwheel Quilt Block Tutorial
- Disappearing Pinwheel Quilt Block – Arrow
- Baby Quilt Tutorial – Disappearing 4 Patch
- Printable Disappearing Quilt Block How To’s
- 4 Patch Disappearing Quilt Block – Criss Cross
- Disappearing Quilt Blocks, Quilts And Printables
- Disappearing 9 Patch With A Double Twist Tutorial
- Disappearing 9 Patch Quilt Block – Criss Cross Cut
- Disappearing Pinwheel Quilt Block – Double Pinwheel
- The Round Robin Edition 7 – Disappearing Quilt Blocks
Frequently Asked Questions
+ What size squares do I need to start with?
You can start with 4.5″ or 5″ squares, depending on the finished block size you want. Precuts like charm packs work great!
+ Can I chain piece this block?
Yes! Chain piecing the initial 4-patches and later the 16-patch will save you time and thread.
+ Is this block beginner-friendly?
Definitely! The cutting and sewing are straightforward, and it’s a great way to practice precision and layout.


Very interesting. This is one I hadn’t thought to slice and dice. I will have to try it and see what I think about those bias edges. I like the fabrics you used.
I LOVE this fabric! What line is it? I’d love to see how this looks totally scrappy… if the pattern just gets lost or if it still has the same effect
Your tutorials are the best!! I am going to do this with my 2 1/2 in blocks that I have been cutting and stashing for years, we’ll see if it works with small squares.
THANK Y OU
Susan i totally understand sewing on the bias. But if you don’t mind a few extra steps you could sew a line on either side of what will be your cut line. to help stabilize the fabric before you cut. but that would mean you have to sew 4 lines before you start. I think i would just suck it up and use pins to hold it.
just a thought
If I Know I’m Going To Have Bias Edges, I Starch Heavily Before I Start Cutting The Initial Pieces. I Like My Fabric Stiff For Piecing – I Get Better Results.
Very fond of disappearing 9 patch but not tried a 16 patch or cutting on the diagonal – will deffo try this one – just love your tutorials – very helpful for a novice quilter – thank you
It looks like some of the fabric from the High Street collection….
This is a great tutorial, showing each step, thanks
I have used the Disappearing 9 Patch method to make a table runner from the special Charm Squares that I picked up on sale at Ricky Timm’s Gallery in Colorado while on vacation. I wanted to use them in a special way to showcase all of the colors in this set of specially dyed fabrics. It turned out great and I love using it. I loved taking squares all of the same size and shape and then ending up with different sizes and shapes with random color combinations in the end. It looks like a complicatied pieced pattern and it was so super easy.
What I didn’t like about it was that the “points” are gone, and I didn’t like the look of it…
I love your tutorials and couldn’t wait until I tried the 16 patch. I have to admit I was disappointed when I put them together all the points were cut off. I was so sad so I think I will use the 16 patch and cut it straight like the 4 patch.
Thank you for listening
Sandra
PS If anyone has any other ideas with the disappearing 16 patch let me know.
Parabéns, muito interessante esta forma de descontruir o trabalho, vou faze-lo.
The ads on your blog made it impossible to read what looked like interesting content.
Try this! After you sew the 16patch block, lay a solid color or white or whatever same size block….right sides together…..and sew 1/4-inch around the entire outside edge. Then cut corner to corner in both directions as in the illustrations. Open and iron the four pieces. You will get four blocks of one half the solid color and half the section of the pieced block.
Hello
I must have missed something. I see you made two diagonal cuts on the 16 patch leaving 4 triangles. How do you get 2 blocks from that? Did I miss a step?
Thanks
I’m confused on what the different lauouts could be and I couldn’t find the ‘page#’ that you referred to in order to viw your other suggestions.