

Learn the quilt as you go method while sewing scrappy fabric ornaments for Christmas. Includes printable templates.
Today is a surprise – Christmas in July!!! I am teaming up with a few awesome others to bring you some fantastic easy, quick, and super cute ornaments!
For my ornament, I thought I would use a previous felt ornament template….but with a new twist. Using the quilt as you go technique, you can sew these up with all your tiny little fabric scrap bits. No piece is too small for this. In fact, the ornaments will look scrappier if you use smaller pieces!
Pointers For Making Quilt-As-You-Go Scrappy Ornaments
- Use Small Scraps: This is the perfect project for tiny fabric leftovers—nothing too small to include!
- Stick with Straight Lines: Sewing straight strips is easier and faster when quilting through all the layers.
- Keep Ribbon Handy: Cut all your hanging loops ahead of time so they’re ready to go as you sew each ornament.
- Batch Your Steps: Try sewing several quilt-as-you-go bases before trimming, then do all the cutting and finishing in one go.
- Don’t Worry About Perfection: These are meant to be fun and scrappy—let loose and enjoy the creative process!

Materials Needed:
- Felt Templates Download
- Scrap fabric – little or big bits of coordinating fabric
- Batting- 12″ X 12″
- Backing- 12″ X 12″
- Fabric: Coordinating fabric and optional scraps
- Tools: Rotary cutter, cutting mat, ruler, sewing machine
- Thread: Matching or contrasting
- Extras: Pins, iron, marking tools (optional)

Want the ad free pdf file?! Scroll to the bottom of the post for more details!
Scrappy Ornaments Instructions:
1) Iron all your scraps so they are nice and flat
2) Layer your backing and batting
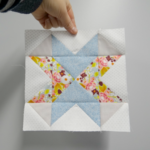
3) Place the first piece of fabric right sides up in the center of the layered piece

4) Pin the next piece along the edge of the first piece- right sides facing and sew

5) Flip the fabric and iron – You can do some quilting right now if you’d like. I did 1/4″ from the seam and again in the center of the strip.

6) Repeat this process until your the whole piece is covered. If you need more instructions on the quilt as you go technique head on over here. Quilt as you go Tutorial.
Ornament Front:

Ornament Back:

7) Print and cut out the template for the ornament
8) Pin template on top of the fabric– my piece of fabric was large enough to cut out two of each shape.

9) Sew around the template.

10) Cut out with pinking shears

11) Cut a ribbon 8″. Fold in half and cross the ends- sew to the front of the shape.
/**/Tips & Tricks
1. Prep with Precision
Iron your scraps flat before you start—this makes them much easier to piece together and helps everything lay smooth completely
2. Choose the Right Batting
Opt for fusible fleece to reduce shifting while sewing. It’s easier than pinning or spray adhesive and stabilizes your patchwork
3. Layer Thoughtfully
Start with backing wrong side up, then batting, then scraps right side up. Sewing through all layers at once is the key quilt-as-you-go technique
4. Keep It Scrappy
Mix up fabric colors and strip widths in each layer for a vibrant, scrappy effect. This method is all about creative freedom
Here Are A Few More Christmas Fun posts:


Additional Christmas Resources
- Christmas Fabric Fat Quarters
- 15+ Fabric Christmas Balls You Can Make
- Christmas Sewing Projects: Let’s Get Festive and Creative!
- Don’t Open Till Christmas – Gift Bag Tutorial and Printable
- Christmas Stockings Quilt Block and Pattern – Jelly Roll Friendly!
Frequently Asked Questions
Q: Do I need batting for this project?
A: Yes! Use batting scraps or thin batting—perfect for a quilt-as-you-go technique and small enough to use leftovers.
Q: Can I use glue instead of sewing the layers?
A: While sewing is ideal for a quilted look, fabric glue can be used to secure pieces temporarily if needed.
Q: What size should each ornament be?
A: That’s totally up to you! Most range from 3″–5″, but feel free to customize based on your fabric and batting scraps.
Q: Can kids help with this project?
A: Absolutely! It’s a great scrap project that’s simple and fun—just supervise during sewing or let them lay out fabric strips.


Hi! Great tutorial and thank you for the access on your library. All those printables could make my quilting easy! What kind of batting do you use on small projects like these ornaments or your mug rugs? I don’t want a very lofty-blanket-like batting for the small projects. Thanks again and looking forward for more tutorials here!