Download The Full Pattern Here
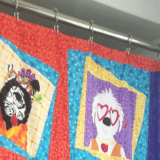
Joy is taking charge of border #3 girls!!! I am so excited to show off what she has come up with—
The cutest vine with with the flower pot- Isn’t it a great compliment to the other borders? I love it!!

*When you layout the pattern under the strip of fabric I would recommend drawing the flower pot on the paper to help you line up the whole thing equally- if you are an equality freak.*

+ Materials Needed For Patchwork Round Robin Border #3 +
- Fabric for Border #3: Choose coordinating fabrics that complement your quilt center.
- Rotary Cutter and Mat: For precise cutting of fabric strips or blocks.
- Ruler: Essential for accurate measurements and cutting.
- Sewing Machine: For stitching the border pieces together.
- Thread: Match or contrast with your fabric, depending on your design preference.
- Iron and Ironing Board: To press seams for a crisp finish.
- Pins or Clips: To keep fabric pieces aligned while sewing.
- Measuring Tape: To ensure the border fits perfectly around your quilt center.

I am not an applique-er remember….so I am just whipping around those hearts and leaves with the good old zigzag on the sewing machine.
But, if you would like to give it a try here is a great tutorial on applique by Corrie.
Just remember to cut the pieces a bit bigger than the pattern so you can turn those edges under and end up with the correct size.
Joy has a great blog —Here is the cliff notes of Joy’s life: I’m Joy, happily married for almost 17 years, and mum to three wonderful children. I homeschool them and try to fit in some sewing and quilting along the way. We live in the country on 14 acres with sheep, alpacas, chooks, ducks, cats, dogs and a rabbit!
she has also started this:

I love the idea of stitching words that are fruit to the spirit. I know I have a lot going on…but really, something easy to stitch while sitting at soccer games {Jerika plays} would be nice. So I might give it a try. She also has a great post on her Round Robin— Check it out here. If you think I am a busy girl though—you need to check out her sidebars girls—look at all those block of the months and quilt-a-longs she does!!
She is also in the middle of moving!! Can you even believe this girl? She is crazy just like me— I love it.
Are you making the Patchwork Round Robin with us?

Next up— Donna Her first border will be on April 12th.
Dates :
Feb 8 – Becky
Feb 22 – Becky
March 8 – Konda
March 22 – Joy
April 12 & OR 26 – Donna
May 10 – Robin
May 24 – Angie
June 14 – Molly
June 28

pst– I have started the side and have the left one almost done. Sooo cute!!
~ Make The Whole Quilt Here ~
- Center Block Pattern
- The Basket got their stems!!
- Patchwork Round Robin- Border #1
- Patchwork Round Robin Border 2
- Patchwork Round Robin Border #4
- Patchwork Round Robin Border #5
- Patchwork Round Robin Border #6
- Patchwork Round Robin Border 7
- Patchwork Round Robin Border #8
FAQ’S Of Border #3
What techniques are used in Border #3?
This border may include piecing, strip sewing, or simple patchwork techniques. Check the instructions for specifics and adjust to your skill level.
What fabrics work best for Border #3?
Choose fabrics that complement your quilt center. Coordinating prints, solids, or small-scale designs work well to enhance the overall look.
Can I use scraps for this border?
Yes! Scraps are perfect for adding personality and texture to Border #3. Just make sure the fabrics blend well with your existing quilt.