
Girls– IT’S FOCUS FRIDAY and the last post on How to bind a Quilt!!!! This is where the non-traditional Binding of Quilts comes in.
This is where the non-traditional Binding of Quilts comes in. This last day is going to be filled with ways to bind a quilt, but really it is how to do something different so you don’t have to bind a quilt. hee hee I am useing the word ‘binding’ very losely here. Don’t get all huffy on me now. I know technically it isn’t a true bind, but get over it. The quilt gets finished and the edge is cute. I am trying to show you that you don’t have to do the traditional binding to have a beautiful finished quilt…..and to tell you the truth- sometimes these little edgeing are cuter than the ‘traditional’. So get your outside the box glasses on and take a look at what else we can do to those edges. These tutorials are great. Perfect patterns for beginners and advanced sewers.
Last weeks Focus Friday, we did an extra large back that came to the front and made a cute little border/binded edge. Today, we have the pillowcase binding, and then ‘bindings’ that include additional cute stuff. aka- prairie points, ruffles, ric-rac, piping, ribbon, and whatever else your wonderful minds can think of.
*PRAIRIE POINTS*
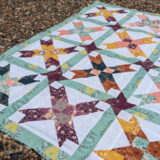
Edges of a quilt can be embellished with dimensional folded-fabric triangles, also know as “prairie points”! The folded triangles can then be nested or overlapped and spaced close together or widely spaced, whichever best fits a quilt’s dimensions.
Use the following guide to help figure out the size square you will need to cut for each prairie point. Determine an appropriate height of the prairie point triangle (how far you would like the points to extend out from the edge of a quilt). Multiply the height of the finished point by 2, then add 1/2″. For example, if you want your points to extend two inches beyond the edge of the quilt, multiply 2″ x 2″ + 1/2″ = 4 /12″. Cut the square for a two inch prairie point 4 1/2″ x 4 1/2″.
Finishing The Quilt
Layer and baste quilt top for quilting method of your choice. When adding prairie points, quilt no closer than 1″ to quilt edges. Trim the batting and backing even with the quilt top. Fold back the backing and pin to secure. (Prairie points are sewn to quilt top and batting only.)
Prairie Points Assembly
Step 1. After using the above formula to determine the size Prairie Points you will be using, fold squares depending on the type of points you want to make. See Diagram I for “nested points” or Diagram II for “overlapped points.” After folding, press to complete prairie point.
|
|
|


Step 2. With right sides facing, position raw edge of each prairie point along quilt raw edge (see Diagram III). Working from the center to the corner , adjust overlap to position prairie points evenly; pin in place and stitch. The two corner Prairie Points should be adjacent to each other and not overlapped. Trim off batting and point of seam allowance on each corner. Turn seam allowance toward the back of the quilt (see Diagram IV). Prairie Points will turn out along the edge.
 Diagram III |
 Diagram IV |
Step 3. Release the pinned backing. Fold under edges 1/4″ and finger press. Pin backing in place over the base of the Prairie Points, covering the seam line. Blindstitch in place (see Diagram V). If necessary, complete quilting out to the edge.

another tutorial at All About
Now girls—- you know me and my lazy sort of way of doing things. I love prairie points, but to tell you the truth….rolling under the backside and then hand stitching that whole edge down. That is NOT my cup of ‘hot cocoa’. So let me tell you that if you are NOT going to quilt that quilt…..and are just going to do either a tie or nothing at all {a small baby throw} then add the prairie points, sew all the parts together- top, batting, and back and then flip it right sides out. If you are quilting it…..well, then. This is the only option out there. I love it though. I have done a few quilts- not many like this.
*Pillow Case*
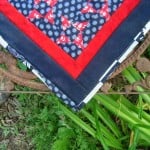
Not every quilt is destined to become an heirloom. Some quilts are thrown together quickly and lead short, hardworking livesas nap quilts at a preschool, for example, or as picnic quilts stored in the trunk of your car. The pillowcase binding method, sometimes also called “birthing” a quilt, is an easy way to bind this kind of everyday, working quilt.
The pillowcase method treats your quilt as if it were a large pillowcase, leaving an opening on one side that’s big enough to turn the “pillowcase” inside out. Then the quilt is turned right side out and blind stitched or top-stitched to close the opening.
The pillowcase method can be a good way to assemble a quilt when you’re in a hurry or if you know the quilt is destined not to become an heirloom. It’s easiest to use on smaller quilts; for example the technique works well with 18″ x 18″ doll quilts.. Some quilters have had trouble turning larger quilts right side out.
Step-by-Step Instructions
- Square up the quilt top.
- Layer the quilt top and backing fabric on your work surface with right sides facing each other, then lay the batting on top, as shown in the photograph below. (If you want to quilt the top before you assemble the quilt, lay the quilt top on top of the batting, right side up. Baste and quilt just those two layers. Once you’ve finished quilting the top, layer the quilted top and the backing fabric with right sides together.)
- Pin every few inches around the edge of the quilt.
- Sew all the way around the quilt with a ½” or ¾” seam allowance, leaving an opening on one side that is big enough to put your hand inside to turn the “pillowcase” right side out. If your quilt is large, allow a bigger opening of 10″-15″ to make it easier to push the bulk of the quilt through.
- Turn the pillowcase right side out and press.
- Blind stitch the opening closed by hand, or fold under the raw edges of the open area and top stitch around the whole quilt.
- Secure the quilt layers together. You can do this in several ways:
- Baste and quilt the layers with hand or machine quilting. Be aware that dense quilting at this stage could cause the quilt to shrink and lose its squareness. Save your fancy quilting for quilts that you bind after you finish the quilting.
- Tie the layers together with yarn.
- Tack the layers together with buttons or decorative stitching. This is a good time to try out some of your sewing machine’s decorative stitches.
Thanks to Quilting Suite101
*RUFFLE EDGE*
Once you get that pillowcase finish down…It’s time to add a bit of fun to it. Ruffled edge.
First you need to make your ruffle.— she uses silky satin fabric. Don’t have to girls! Go ahead and use that cotton or whatever.
Then stick it into the quilt sandwich and finish it off. Click here for a wonderful tutorial on adding that ruffle.
Craft Apple uses her Ruffler foot for her sewing machine. Perfect for the non-ruffler types.
Adding that ruffle can bring that simple pillowcase a bit of fancy to it.
thanks to
*RIC RAC EDGE*

Sew Much Ado has the tutorial for adding ric rac along your edge. Again. A great addition to that simple pillowcase blanket.
*RIBBON EDGE*

TaDa! Creations made the ribbon edge tutorial and it is sooo doable girls! This is on a small, doll size quilt scale. But who makes the rules? I am sure that it would be just as cute in larger- kid sized scale.
Add a little bit of piping. PDF tutorial by Trish. The binding is a bit bigger, but it is really quite cute.
Needle Pointers has a great list of resources for the whole binding process too. Go check it out if you need some more reading. 🙂
Share your tips and tricks for binding and finishing your quilts!!! Leave a comment and let us know what they are.
pst- Get a free Quick Stitch pattern – more info here. Only a few more days— come on, help a learning girl out will ya?
pst-pst– want more Focus Fridays? Read them here.


I’ve tried the pillowcase method. It’s the only way I’ve ever been able to complete a quilt all on my own… Typically, I piece it, quilt it, and then hand it to my grandmother to bind for me! I’d love to add some girly stuff to the edge of a quilt. That ruffle is great! Thanks for sharing!
I want to know how to put on binding when the angle is a 90 degree in. Opposite from the 90 degree corner angles. Thanks for your help. Mary
Hi!
And Help! ~please~
I have madi a quilt, 68″x80″ and I put the binding on before I tied it. Will it be terrible if I tie it now or do I need to take the binding off?
Thank you!!!
Patty
patty- no worries. some bind before they tie or quilt. it can lead to a few puckers, but with tieying the quilt you shouldn’t have any problems because they are spaced a bit apart.
Thank~You! I was worried as I looked on the internet and read that you should ‘always’ tie/quilt BEFORE binding.
Thanks!
patty
I know how to bind a quilt, but I want to use a ruffle and the quilt is one of those that has a cute little front and back and is already quilted. Does anyone have any idea how to put the ruffle on the quilt when you don’t have the regular top and bottom, but just a straight already quilted edge.
hi donna- i am thinking outloud here– what if you snipped some of the quilting next to the edge, say 1″ and then folded the edges under and ironed them very well. then you would pin the ruffle inside the little folded sandwich and sew the edge down. does that make sense? maybe I could do a how to on that some time.
I have put Prairie points on my quilt and am using a folded binding on the back but cannot figure out how to do the corners so they lie flat. Any help would be greatly appreciated. I am going to try the ribbon border on a baby quilt I will make this summer. Thanks for any help!
Diana- keep your points away from the corners 1/4 inch. that way when you turn it right sides out, they don’t pucker. you’ll have a point at the top and the side, not one sticking out of the corner. does that make sense?