Last week I did a quick tutorial on sewing pattern weights…and after I was done, I thought- hey, those look a lot like pin cushions! So of course this week is pin cushions.
These are sooo simple. And, since I am a believer that most of us sewers are pin cushion collectors this would be a good one!
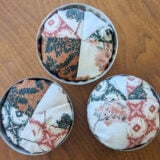
The great thing about this is that you just need to find 1 quilt block. That’s it. The back can be a scrap piece of fabric. If you are really feeling like you just want those orphan quilt blocks gone, then go ahead and use 2. It could be reversible if you did!

Pin Cushion Instructions:
- Cut the back the same size as your quilt block {I used a 4″ quilt block, but you can go as large or small as you’d like}
- Cut 1 batting the same size also
- Pin the top quilt block on top of the batting {wrong side of quilt block is touching the batting}
- Quilt just a little bit- can be a meandor, straight lines, stitch in the ditch.
- Pin right sides together the quilted top and the backing
- Sew all the way around leaving an opening for turning
- Snip corners and turn right sides out
- Stuff firmly with polyfil or crushed walnut shells or check out what materials you can use for inside your pincushion here.
- Ladder stitch the opening closed
If you’d like you can add a button in the center of the block on both sides to accessorize it just a little bit. Because you are pulling the thread tight when you sew them on, this will compress the pincushion and firm it up a bit more too. {plus, it’s cute}

Looking for a few other pincushions? Here are 3! Rolled Wool, Doily, or using kitchki items. Check them out here.