Full tutorial and video showing you: self binding quilt tutorial. Take the fabric from the back and use it for the binding. Quick, simple & works great!
Binding time is finally here….but what to do, what to do?!
Today I’m sharing a few tips on self binding your quilt – it uses the backing fabric!
There is a double fold, so it is just as strong as a traditional binding, but it’s quick and simple and when you are in a pinch for time or fabric- it works great!
You’ll find a full tutorial with images to help you out, plus an extra section specifically for tackling those corners – and a video at the end! It will walk you through the steps and you can watch it in action.
Self Binding Quilt Tutorial
1) Before quilting you need to make sure that your back is LARGER than your front!! This is the only way that this type of binding will work. You should always have extra on the sides when quilting anyways, but just in case check.

2) After quilting you need to trim those edges. The TOP of the quilt and the batting needs to be trimmed to the edge of the top of the quilt. Scissors are the best here. You need to especially make sure that the back doesn’t sneak into that scissor line and get snipped. { i really hate it when that happens} You want to be cutting ONLY the TOP and the BATTING here. NOT THE BACK!!!
3) Trim the back. Now you can use a super long ruler with your rotary cutter and trim the back. Take your ruler and measure 3/4 inch past the top. BE consistant on this girls! It helps the front look nice I tell you. Go around all 4 sides and trim, trim, trim. 3/4 inch. yup. that’s it.

4) Now is the making the binding part. Take that 3/4 inch extra back and fold it. Line the raw edge right up to the edge of the top and batting edge.

5) Fold once more. It will fold onto the top of the quilt and be 1/4 inch past the edge.

6) Pin, hold, clip in place. Now, here girls is where I cheat. I have been doing the binding for too many years to mention { don’t judge me now} and so I can just whip it over to the machine and get that thing done in no time. No pinning or clipping for me. I know how to keep it in place and make it behave. If you noticed though girls- this is Very similar to rolling the edge over on a blanket and making it a nice egde.
7) Sew that edge down. Take it to the sewing machine and sew right along that edge. You don’t want to be so close you are constantly jumping off and missing it, but not so far in it looks like a rookie was doing it. {rookies become pros though, so don’t give up}

Self Binding quilt tutorial corners!
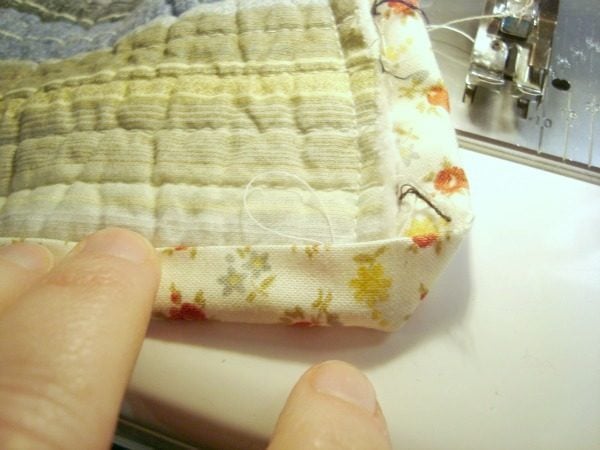
The corners on a self binding from the back are sometimes tricky. You’ll have to maybe spend a few moments fiddling with the fabric and the edges to get the miter and the corner to look how you want.
Once you get the hang of it, the corners will go a little quicker.
Use pins or clips to keep the fabric in place and from shifting. I usually keep my needle in the down position and fiddle with the fabric / binding and then move on a little section at a time. (I know the quilt in the image isn’t under the needle- it was easier to take the picture)

Fold the other side overlapping the first fold. The corner should naturally make a miter, but you can force it if you need

You can now go and stitch with your machine along the edge of the binding.
There are a few who take a little hand stitches to keep the miter from opening {if you are sewing your binding down by hand, then you can take a couple of stitches when you pass the corner} if you don’t like how it leaves a slight pucker.

If you are anything like me, watching the actual action is soooo helpful.
Here’s a quick video walking you through the full self binding tutorial:
Another fun binding trick is to have a larger binding – which then shows on the front:

Full tutorial > self binding quilt tutorial with large mitered corner.
Have a tip to add?

Becky Jorgensen is the creative quilter behind Patchwork Posse, the Patchwork Planner and her online quilt group Patchworkers Plus. You can find her patterns in books, magazines, and her quilt membership. Gather your quilting supplies, organize your sewing space, explore the process of disappearing quilt blocks, or finish a free quilt pattern. I'll help you use what you have, finish what you start and make your quilting journey fun!
Follow me here: Facebook, Pinterest, YouTube


My mom tried teaching this technique to me when I was a young girl. I just didn’t really understand it then. I have saved your page here so the next time I make a quilt I can try this technique of the self-binding quilt. Thank you for sharing it with us.
Thanks for this. I’m just about finished with a small wall hanging that I may try this with, though I’m not sure I have enough overage on all sides. If not, it will be helpful for the future.
Thanks for this. I’m just about finished with a small wall hanging that I may try this with, though I’m not sure I have enough overage on all sides. If not, it will be helpful for the future. I appreciate the written tutorial as I’m not as good with videos!