

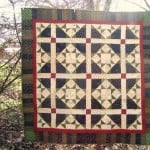
I hate letting good fabric go to waste—those leftover triangles from my pineapple quilt were just too pretty to toss! So instead of letting them sit in my scrap bin, I turned them into a scrappy doll quilt. This little project is quick, fun, and the perfect way to use up bits and pieces from other quilts.
In this tutorial, I’ll show you how I repurposed scraps into cozy blocks, added simple borders, and pieced together a mini quilt that’s just right for dolls, wall hangings, or even as a small table topper. Grab your cut-offs and let’s stitch something sweet together!

Supplies For Sewing:
- Leftover Triangles from the Pineapple quilt block or your fabric stash
- Strips of fabric- background 2 1/2″ strips
Want the ad free pdf file?! Scroll to the bottom of the post for more details!
– Tips & Tricks –
- Press carefully – Pressing seams open or to the side will help reduce bulk, especially in small blocks.
- Work with what you have – Scrappy projects don’t need to be perfect; embrace different colors, patterns, and fabric sizes.
- Trim as you go – Squaring up blocks after each step keeps your quilt flat and easier to assemble.
- Keep it small – Doll quilts are a great place to practice new techniques on a small scale before tackling a full-size quilt.
- Mix in neutrals – If your scraps feel too busy, add a few solid or low-volume pieces to balance the look.
Doll Quilt Instructions:
Dig through your scraps of cut-offs and find triangles that are similar in size.

1) Sew your leftover pieces together. Mine were triangle so I sewed them together to make a square quilt block.

2) Square up your blocks {if needed}
3) Sew borders with the 2 1/2″ strips to make bigger.

4) Start laying the new blocks side by side and sew them together. Some might be a big bigger than the others, that’s all right.
5) Trim off the extra to make the one strip all the same size

6) Repeat this process until you have 3 rows {or how many you’d like}
7) Sew the rows together

8) Layer with the backing, batting and quilt your doll quilt
9) Bind your doll quilt. You can do a traditional binding or fold the back to the front bind
Mistakes To Avoid
- Rushing the finish – Take time with binding and quilting, even on a small project—it makes a big difference.
- Skipping the trimming – Not squaring up blocks can lead to a wobbly quilt top.
- Over-matching scraps – Don’t stress too much about perfect color coordination; the charm is in the mix.
- Using bulky seams – Avoid stacking thick seam allowances, as they can make quilting harder on a small project.
- Ignoring fabric weights – Mixing fabrics of very different thicknesses (like flannel with quilting cotton) may cause uneven seams.
/**/
Learn how to make a doll bed out of a vintage magazine rack, and bedding for it. Doll Bedding Tutorials included: doll pillow, doll blanket, and a doll bed mattress.

Have more scraps or quilt blocks? Here’s another tutorial on how to make a few different doll quilts.


What is the over all measurement of the doll quilt?