
Got a stack of 10″ squares (a.k.a. layer cakes) waiting for their moment to shine? Let’s turn them into a stunning chevron quilt that’s as fun to make as it is to snuggle under. This project is perfect for beginners and seasoned quilters alike—no complex math, just simple half-square triangles (HSTs) that come together in a rhythmic zigzag pattern.
Whether you’re using a coordinated layer cake bundle or mixing and matching from your stash, this quilt is a fantastic way to play with color and contrast. Plus, it’s a great excuse to spend some quality time with your sewing machine and favorite fabrics
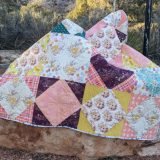
This layer cake quilt is a chevron style. Using two fabrics the same size and making them into half square triangles, you end up with a whole lap sized quilt.
The Chevron Quilt is really a super simple one.
The idea is that you match up one light or medium fabric with a dark fabric. You will need enough contrast in the colors to make this one work.
If you are really looking for something that matches a lot and has a pattern– then you can pick one of the fabrics to be the same for all the blocks.
You can play around with a few options and ideas…and then get started!
What is a Layer Cake?
A layer cake is a piece of fabric that is cut to the size of 10″ x 10″
They can come all together in a collection of the full fabric line, or they can be cut by yourself from the stash that you have on hand.
Either works – and they are the perfect size for layering together and cutting together. They can really make sewing a quilt quick and simple.
Materials Needed:
- 1 layer cake with a variety of lights / darks
OR
- 42 squares of fabric all the SAME SIZE
– Preparing Your Layer Cake –
How do I select and organize Layer Cake squares for the Chevron design?
Choose a variety of colors and patterns that will create contrast in the Chevron design. Lay out the squares in a way that balances light and dark tones across the quilt.
What’s the best way to cut and arrange the squares for the Chevron pattern?
Cut the Layer Cake squares into the shapes needed for the Chevron pattern, typically triangles or strips. Arrange them carefully to ensure the Chevron lines up correctly before you start sewing.
Layer Cake Quilt — Chevron Style Tutorial~
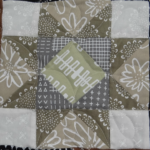
Sew the quilt block. You can use this quick and simple method for making your quilt blocks: Easy Chevron Style Quilt Block Tutorial
How to sew a chevron quilt block:
1) Lay right sides together the background and 5″ X 5″ main fabric
2) With a ruler and pencil, draw a line from corner to corner of the square
3) Sew on either side of the drawn line. A scant 1/4″ is best
4) Cut on drawn line and iron
5) Repeat with other squares
6) Play with your layout- you can put the 2 matching blocks together, or you can mix and match for a scrappy chevron quilt block. Either way works great!


7) Sew the pairs together
Sew the quilt top. Play with the layout until you are happy with the way it looks. Ask opinions of others– this is always helpful! Having a fresh eye on the quilt while it’s coming together makes it turn out better! You’ll find that you miss a few matching spots or maybe you’ll find a better layout!
Either way, just play, play, play until you are happy.
- Sew the blocks together in rows
- Sew the rows together
- Add a border if you are wanting one. I did not on the Chevron quilt I made…..it was large enough and it wasn’t needed.
Get the Chevron Layer Cake Pattern
Sew up your favorite layer cake with this finish-friendly quilt you’ll love. You’ll finish this quilt over the weekend.
Finishing The Quilt
1. Cut or piece together your batting and a piece of quilt backing fabric.
2. Make a quilt sandwich with the backing, batting, and top.
3. Baste together with fusible batting, pins or basting spray.
3. Quilt as desired. A few of my favorite ways to quilt are Straight line quilting or cross hatch quilting. Use a walking foot on your sewing machine. Trim away the extra batting and backing.
4. Cut strips of fabric for the binding. Cut 2 1/2” tall (sometimes I use 2 1/4″) binding strips. Sew the binding strips together and bind using your favorite technique.
Additional Tips-
Fabric Selection & Color Contrast
Choosing fabrics with good contrast is key to making the chevron pattern pop. Pairing light and dark fabrics will enhance the zigzag effect. If you’re aiming for a more subtle look, consider using fabrics within the same color family but varying in intensity.
Efficient HST Assembly
While the traditional method of making HSTs works well, you might want to introduce the “four-at-a-time” method for efficiency.
This technique speeds up the process and ensures consistency in your blocks.
Pressing & Trimming
After sewing, press your HSTs carefully to set the seams. Using a pressing cloth can help prevent stretching. Trimming each HST to a uniform size ensures that your quilt top assembles smoothly and your points align beautifully.
Layout Planning
Before sewing your blocks together, lay them out on a design wall or floor to plan your chevron pattern. This step allows you to experiment with color placement and make adjustments for a balanced look.
Finishing Touches
Consider adding a border to frame your quilt and give it a polished finish. A solid border can provide a resting place for the eyes and enhance the overall design. When it comes to quilting, straight-line stitching along the chevron lines can accentuate the pattern, while free-motion quilting adds a touch of whimsy.
Here’s a quick close up of the blocks that were put together-
As you can see, I tried to put together rows of colors— so there is a row of red, purple…some spots (like the bottom left) are not necessarily correct, but I had to use what I had and this is how it turned out. Maybe if I had fussed a little more things would have been different, but I was ok with how it was.

WANT TO REMEMBER THIS? SAVE THE LAYER CAKE CHEVRON QUILT TUTORIAL TO YOUR FAVORITE DIY PINTEREST BOARD!
This is part of a tiny series using layer cakes. Interested in seeing what else you can make using them? Check out all the tutorials here.
More Layer Cake Fun:


Lovely and informative. Thanks very much.
Thanks for the 3 different ways of using layer cakes .
These will be great gifts for the men in my life