
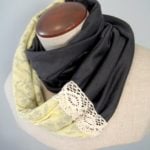
This week for the 52 Quilt Block Pick up we are going for something warm! I am a lover of scarfs– it’s totally not a secret around here. I have many, and they are all different. I have crocheted, scrunchy ones, silky, knitted….you name it. I wear it and love it! However….every time I wear this scarf I get compliments! People notice. So, I thought. Wouldn’t it be great if everyone could have a patchwork scarf just like me so they can get compliments too? yeah!


Scarf Tutorial with your UFO Quilt Blocks

The pieces I used were men’s wool suiting fabric swatches. I picked up a box of these a few years ago and love them! Just thought I’d mention what I used.
You will be picking through your stash and of course some UFO Quilt Blocks to make your very own– complimentable winter scarf.
The width that I went with is 7″. The length is really up to you and where you like yours to go. Longer to tie up more. Shorter for tucking into the front of your coat. Try on a few different scarfs that you have and measure the one that you love the most.
You might want to decide on the width of the patchwork scarf after you dig through your ufo quilt block stash. That way you can make it a little bit wider if you’d like or you can make it narrower. This is really up to the blocks you have and what you are willing to do with them {dare I say take a pair of scissors to them and cut them up?}
The backing for mine is pink- pink flannel. There is no lining or batting in between the layers. I thought that would be too bulky to wear around to put that inside. I love the softness of the flannel and they move easily together so you can tie them if you’d like.
This is one of the ufo quilt blocks i used. I had combined a few pieces of scrap fabric to make a 7″ X 9″ block. If you have blocks that are bigger than this size you can go bigger on the width.

After you have decided on your length her comes the fun part!
1) Cut the length and width you are going for out of the backing fabric {pink flannel for me}.
2) Make a parade out of your blocks. Line them up all in a row and start sewing them together. Lay them right on top of the backing piece. {you will not be sewing these together, but this will help you figure out how much farther you need your blocks to go} If the blocks are not long enough —add some scraps in between the blocks for spacers. kind of like sewing a log cabin. You add a piece to one side…then maybe another one to the opposite side. This will help keep the busy blocks a little bit apart so they don’t make your eyes go crazy.

*HINTS* Don’t think straight lines here. Mix it up a bit with a spacer sewn to the block on an angle. This makes it a bit more interesting and fun!
3) Keep sewing and ironing the long strip and measuring it against your backing piece
4) Trim the long strip if needed- make sure it is straight and long enough
5) Lay the backing fabric right sides to the pieced scarf you have just sewn
6) Pin it together
7) Sew all the way around leaving a 3″ opening for turning
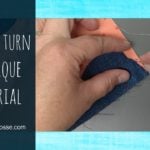
8) Snip those corners, turn right sides out, iron
9) Hand stitch the opening closed
10) Using your machine sew all the way around the scarf {this will keep it from rolling around and doing something weird when you wash it} 1/4″ from the edge. I sewed mine with pink thread so it would stand out a little bit. You could totally go for a decorative stitch or hand stitch with big chunky thread.

I also added a sweet little flower set stitched with big pink, fuzzy thread and lots of french knots. They pop out on the darker fabric. Love it!
Can’t wait to see the scarfs that you come up with your UFO Quilt Blocks and just in case you are a scarf lover just like me– here is a post with a whole bunch of scarf tutorials!


I am really enjoying the post
Thanks for this idea. I have a lot of my husband’s shirts I am trying to use in different projects. I made 3 memory bears and have scraps left over. These will make a wonderful scarf. Something I can wear and smile at the memories. He passed this past October. If you come up with a hat/beanie idea using cotton I would love to see a tutorial.