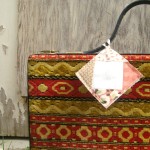
Sewing your own fabric storage bin is easy when you use orphan quilt blocks! Learn how to sew them together with a lining.
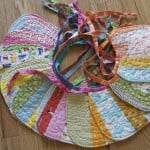
Sewing your own little fabric storage bin is a great way to use your quilt blocks. Keeping the quilt blocks the same size is the key to making this tutorial work. Mix and match the blocks, or coordinate them depending on where you will be using the fabric bin.
The lining can be quilted to the batting or use fusible fleece to give it some stiffness and shape. These storage bins are great for storing scraps, supplies, notions, or whatever else you can think of!

Fabric storage bins are a great way to add both function and style to your space. Whether you’re using them to organize sewing supplies, store fabric scraps, or tidy up other areas of your home, they’re a fun and practical project.
The best part? You can make them completely unique by choosing your favorite fabrics, playing with different quilt blocks, or adjusting the size to fit your needs.
This tutorial will walk you through each step, making it easy to create a sturdy, stylish fabric bin in no time!
Materials Needed:
- 4 quilt blocks 6 1/2″ X 6 1/2″
- 6 1/2″ X 25″ lining
- 2– 6 1/2″ X 6 1/2″ bottom
- Batting or Fusible Fleece : 6 1/2″ X 6 1/2″ and 6 1/2″ X 25″
- Fabric: Coordinating fabric and optional scraps
- Tools: Rotary cutter, cutting mat, ruler, sewing machine
- Thread: Matching or contrasting
- Extras: Pins, iron, marking tools (optional)

– Fabric Storage Bin Instructions –
Instructions For The Outside:
Step 1- Sew the four quilt blocks together in a long row
Step 2- Sew the ends together to make a ‘tube’
Step 3- Sew one 6 1/2″ X 6 1/2″ square to the bottom
*quick note. When you are sewing the square bottom to the tube sides, you are going to STOP the stitching 1/4″ from the corner. If you sew to the end, it can cause some issues. So, stopping 1/4″ then pivoting and making some adjustments so you can sew the next side is best. It’s a little tricky at the beginning, but by the last corner – you’ll get it.
Repeat the steps above for the lining adding one step-
Lay the lining on the batting and quilt them together
Repeat with the bottom 6 1/2″ X 6 1/2″ square and the batting piece for the bottom
Pin the outside piece to the lining {right sides facing}
Sew all the way around the top edge, leaving a 2 1/2″ opening for turning
Turn right sides out and push the lining inside the bin
Iron and sew by hand the opening closed. Sew 1/4″ from the top for a finished look

You can adjust this pattern to any kind of quilt blocks that you might have. Just make sure that the lining is adjusted also. The bottom is always going to be the same size as the quilt block, unless you want something different than a square.
Interfacing & Stabilizer Recommendations
Choosing the right interfacing or stabilizer helps give your fabric bin the structure it needs. Here are a few simple options:
- Fusible Fleece – Adds a soft but structured feel, great for bins that need a little padding.
- Medium-Weight Fusible Interfacing – Helps fabric hold its shape without being too stiff, perfect for everyday use.
- Peltex or Heavyweight Stabilizer – Ideal for firm, structured bins that need to stand up on their own.
For a flexible but sturdy bin, you can also layer interfacing or combine different types based on the look and feel you want!
Usage Ideas for Fabric Storage Bins (Sewing & Quilting)
- Scrap Storage – Keep fabric scraps sorted by color or size for easy access when quilting.
- Project Organizer – Store work-in-progress quilt blocks and pieces so they stay neat between sewing sessions.
- Thread & Notion Holder – Use smaller bins to organize spools of thread, bobbins, and essential sewing tools.
- Fat Quarter or Precut Storage – Keep charm packs, jelly rolls, or fat quarters organized and ready to use.
- Pattern Keeper – Store printed patterns, templates, and instruction sheets so they don’t get lost in your sewing space.
- Hand Sewing Kit – Create a portable bin for embroidery, EPP, or hand quilting projects to grab and go.
- Ruler & Template Storage – Keep quilting rulers and specialty templates in one spot for easy access.
- Binding & Backing Organizer – Store prepped binding strips or backing fabrics so they’re ready when you need them.
- Sewing Room Declutter – Use bins to contain small tools, zippers, or other notions that tend to pile up.
- Retreat or Sewing Day Tote – Pack up supplies and tools for an easy-to-carry, organized way to bring everything you need.

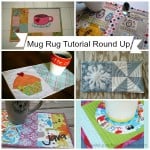
Fabric storage bins for storage – loaded with fun tutorials and patterns!
WANT TO REMEMBER THIS? SAVE THE HOW TO SEW A FABRIC BIN TUTORIAL TO YOUR FAVORITE DIY PINTEREST BOARD!

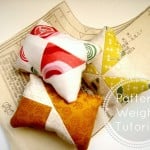
~ More Sewing Room Organization Resources ~
Simple Thread Catcher

This is similar to the fabric bin, but made for catching your threads at your sewing machine.
Sewing on the go

Gather your favorite notions and put together an on-the-go sewing container. Perfect for retreats or sewing days with your friends.
- How to store your quilting rulers
- Fat quarter storage ideas
- Quilting tools and supplies every quilter should have
- 15+ ways to use your fabric stash
- Cricut Machine Tool Organizer
- Organize your Sewing Machine Needles
- 5 Ways to Organize Your Quilt Orphan Projects
- How to Organize Ribbon Scraps & Spools
- How To Organize Your Sewing Room without Overwhelming Yourself
Frequently Asked Questions
+ What materials do I need to make the fabric storage bin?
You’ll need four 6½″ x 6½″ quilt blocks, a 6½″ x 25″ lining piece, two 6½″ x 6½″ squares for the bottom, and batting or fusible fleece of the same sizes.
+ Can I use different sizes for the quilt blocks?
Yes, you can adjust the size of the quilt blocks to fit your needs. Just ensure that the lining and bottom pieces are adjusted accordingly to match the new dimensions.
+ What type of interfacing or stabilizer is recommended?
The tutorial suggests using fusible fleece for a soft yet structured feel, medium-weight fusible interfacing for everyday use, or Peltex/heavyweight stabilizer for bins that need to stand up on their own.
+ Is this project suitable for beginners?
Yes, this is a beginner-friendly project. The tutorial provides step-by-step instructions, making it easy to follow along and complete the fabric storage bin.
+ Can I quilt the lining to the batting?
Absolutely! Quilting the lining to the batting adds extra structure and durability to the bin.