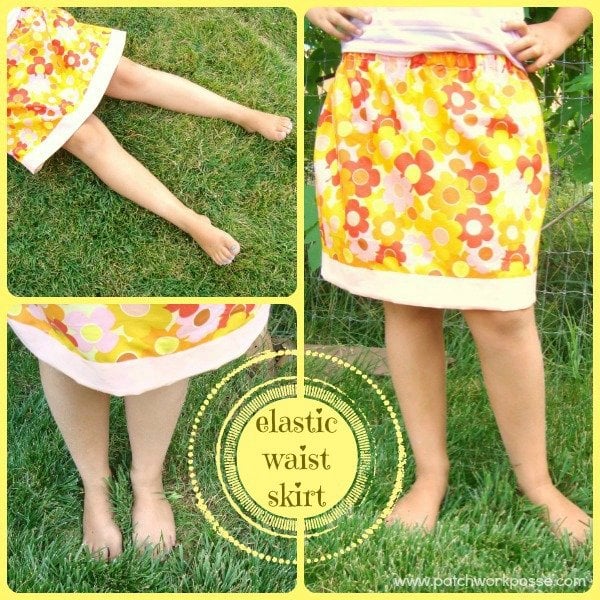
I am kicking off a quick series this month. It’s going to be all about an elastic waist skirt. One of the easiest skirts you can sew in the clothing world.
Today we will hit the pattern itself and how you shouldn’t be afraid of sewing a skirt. It’s the gathered skirt – of course there is no hand gathering. We let the elastic band on the waist do that for us.
The next few weeks {on Wednesdays} I will go over adding a little bit of embroidery, applique and other fun embellishments to turn that boring old elastic waist skirt to something cute and loveable by the girls that will wear them! {mine are totally opinionated, so if it doesn’t work for them, I won’t share it here. Meaning, I will get it pre-approved by the 9 year old, so you know it’s gotta be good!}

I am not a big fan of sewing hems– somehow they end up a little bit bumpy or weird. Like the fabric gets all bent out of shape. If I can, I use hem tape. It makes a nice clean hem. Doesn’t eat up your length {great trick if you are like me and sometimes cut things too short}. This is the method that I will be using on the hem of the elastic waist skirt. Couldn’t get any easier than that!
And- yes she is wearing a striped shirt with a flower skirt– just like her dad. 🙂
Gathered Skirt Tutorial~
Materials needed:
* waist band elastic at least 3/4-1″ wide –the wider elastic helps it from rolling after you have it sewn in the casing and it looks better
* 3/4 yard fabric for a 18″ high X 23″ wide skirt {you will need 2 of these-front and back} I went off of measurements from Eliza. You might want to do a quick check with your kiddo before you start to make sure you are on the right path of sizing. Keep in mind that the only hem will be the casing for the elastic. The bottom will loose only 1/4″ in length.
* double fold bias tape {the one used in this skirt tutorial was 2″ wide}

1) Measure waist for your elastic. Measure around the waist of the child. Subtract 1-2″ depending on how gathered you would like the waist to be. Cut elastic to measurement.
2) Pin right sides together the front and back of the skirt.
3) Sew the side seams with a straight stitch.
4) Sew a zig zag stitch along the raw edge. You don’t want them to constantly pick off strings when they are wearing their super cute skirt.
5) Fold and iron the top edge 1/4″
6) Fold and iron the top edge again -making sure that 1/4″ is tucked under a little larger than the elastic width that you are using. {go ahead and place elastic on the hem top so you can make sure it will fit. Use this as a guide when ironing if needed.
7) Sew along the bottom edge of the hem— leaving a 3″ opening so you can feed the elastic in
8) Pinning one end of the elastic to the side of the skirt and with a second safety pin, thread the elastic through the casing
9) Making sure that the elastic is not twisted {I totally hate it when that happens}, overlap the ends and sew an X to secure them –try on child and make adjustments now if needed.
10) Pull on the elastic until it is all inside the casing. Sew the opening closed
11) Cut the hem tape the same size as the bottom of the skirt + 1/2″ Open up both hems, lay right sides together- the ends of the hem tape, and sew them together. You will now have a tube of hem tape. Open the seam flat and fold the hems back down and iron
12) Open one hem of the hem tape and lay it right along the bottom edge of the skirt. You will be matching up -wrong side of the skirt with the right side of the hem tape
13) Sew just inside the folded crease of the hem tape- sew all the way around the hem tape/skirt bottom
14) Fold the hem tape to the front of the skirt and iron- make sure the other hem side is tucked under and the edge is perfect {you don’t want any skirt showing below the hem tape}
15) Iron the hem, making any adjustments so the edge is lined up properly
16) Sew along the top edge of the hem tape to secure. Sew all the way around the skirt * Take a quick look in the photo above at the hem. See how the hem tape folds over, hiding the raw edge, and up to the front right side? Then the top of the hem tape is hemmed of course and tucks under perfectly. Make sure that bottom edge when ironing doesn’t scoot, bringing the wrong side of the skirt fabric to the front.
If you have any questions- let me know…..I’d love to help.
Stay tuned for next week when we add a little bit of fun to the skirt!
For more skirt fun- check this out:

Becky Jorgensen is the creative quilter behind Patchwork Posse, the Patchwork Planner and her online quilt group Patchworkers Plus. You can find her patterns in books, magazines, and her quilt membership. Gather your quilting supplies, organize your sewing space, explore the process of disappearing quilt blocks, or finish a free quilt pattern. I'll help you use what you have, finish what you start and make your quilting journey fun!
Follow me here: Facebook, Pinterest, YouTube


Easy enough! I am featuring you tomorrow.
thanks for sharing it- 🙂
Lovely makeover!