

8 half square triangles sewn at one time? Can that really even happen? I am one that sews fast. The faster the better. I even have been accused to shaking the table with my sewing machine speed.
This is the neatest little trick ever! Half square triangles can get a little boring. Especially if you need a lot of them! I am always on the lookout for new ways to speed up the sewing and this one is my current favorite.

Materials Needed:
- 1 Background
- 1 Other
- It doesn’t matter what size you start with, just as long as they are equal in size. For this tutorial I used 2– 9″ X 9″ squares.
- These ended up at 4″ X 4″ unfinished. They could also be squared up to a smaller size if needed. 3 1/2″ square would equal to a 12 1/2″ unfinished quilt block if you were to sew all 8 of them together for a quilt block.
- Fabric: Coordinating fabric and optional scraps
- Tools: Rotary cutter, cutting mat, ruler, sewing machine
- Thread: Matching or contrasting
- Extras: Pins, iron, marking tools (optional)

Tips & Tricks:
1. Use starch or fabric sizing:
This helps reduce fabric stretching and keeps your squares crisp for accurate sewing and cutting.
2. Chain piece for efficiency:
Sew all your seams on one line, then rotate and do the others—saves time and thread!
3. Use a scant ¼” seam:
A slightly smaller seam allows for cleaner trimming and helps your finished blocks stay true to size.
4. Press before cutting:
Give your fabric a quick press after sewing but before slicing—it helps lock the stitches in place.
5. Rotate your mat, not your fabric:
When making your final diagonal cuts, rotating your cutting mat instead of shifting the fabric helps keep everything aligned.
6. Square up every block:
Even small trimming makes a big difference in the final quilt layout—don’t skip this step!
8 Half Square Triangles At Once Instructions:
1) Lay your squares right sides together
2) With a ruler and pencil, mark a line from corner to corner. Repeat for opposite corner.

3) Mark the middle of the square on either side also
4) Sew a SCANT 1/4″ from the CORNER TO CORNER lines
5) Sew again on the other side of the drawn line
6) Repeat steps 4 and 5 for the other corner to corner line

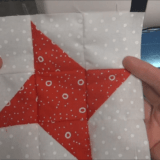
7) Cut on the drawn lines
8) Iron and square to size

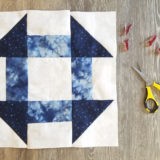
9) If you have a project for them to go into….you are set to go. If not, you can play with the layout of the squares.
Here Are 4 Variations:

Grab all 4 methods for making HST:
/**/More info on the half square triangle – all 4 methods and a calculator that you can use to customize your size!
.hsts-calculator { max-width: 400px; border: 2px solid #d3dce6; padding: 1rem; border-radius: 10px; background-color: #f7f9fc; font-family: Arial, sans-serif; color: #333; } .hsts-calculator h3 { margin-top: 0; font-size: 1.25rem; color: #415a77; } .hsts-calculator label { font-weight: bold; display: block; margin-bottom: 0.5rem; } .hsts-calculator select { width: 100%; padding: 0.5rem; margin-bottom: 1rem; border: 1px solid #ccc; border-radius: 5px; } .hsts-results { background: #fff; padding: 0.75rem; border: 1px solid #e0e0e0; border-radius: 5px; } .hsts-results p { margin: 0.5rem 0; } .hsts-brand { margin-top: 1rem; font-size: 0.9rem; text-align: center; color: #7a8a99; }8-at-a-time Half Square Triangle Calculator
0.5″ 1″ 1.5″ 2″ 2.5″ 3″ 3.5″ 4″ 4.5″ 5″ 5.5″ 6″ 6.5″ 7″ 7.5″ 8″ 8.5″ 9″ 9.5″ 10″Finished Size: 2″
Cut 2 Squares: 5″
(Makes 8 HST units)
Finished Size: ${size}”
Cut 2 Squares: ${cutSize}”
(Makes 8 HST units)
`; } calculateHST8();Additional Half Square Resources
- Free Printable Half Square Triangles
- How to Use Half Square Triangle Paper
- Squaring up Half Square Triangles with the Bloc Loc Ruler
- How To Sew Half Square Triangles With Fabric Strips Or Jelly Rolls
- Charm Packs And Half Square Triangles Paper Templates
Frequently Asked Questions
1. How many squares do I need to start the process?
Use two equal-sized fabric squares—common starting sizes include 9″ (makes 4″ HSTs) or any size you choose
2. What are the basic steps for the technique?
Stack right sides together, draw diagonal lines corner-to-corner, sew a scant ¼″ on both sides of each diagonal, cut along lines, press and trim
3. What size are the resulting HSTs?
Depending on your starting size—for example, two 9″ squares yield eight 4″ unfinished HSTs (4½″ before trimming)
4. Is this faster than traditional methods?
Yes—this method creates eight HSTs in one batch, making it a much quicker alternative to the usual two or four-at-a-time methods


That is just to cool! The faster the better! Thank you for the tip 🙂
To mark lines on dark fabrics I use a Chaco Liner that I have refilled with iron away pounce powder. Works like a charm and leaves nothing behind! !
I love this method of making HST!! Thanks for a great photo reference to go along with the directions!
Yes I have tried this method and it is an awesome way to make up half squares triangles. I made a small table cloth last week laying out the triangles as pinwheels.
Have always had trouble with HST. This looks great, thank you so much.
Can hardly wait to try it.
I think these were originally called “Magic 8’s” when they were first introduced. Method makes great HST easy and fast. Thank you for the tutorial.
I didn’t know that! It is magic….makes sense!
Pam- I will have to try the chaco liner…..I haven’t yet! Thanks for the suggestion.
What a great idea! Thanks for taking the time to write this helpful post!
This shows drawing lines BUT – if you sew around all four edges then cut diagonally both ways then in half both ways you’ll get eight hsts. If you cut only diagonally both ways you’ll get four larger hsts. That eliminates the ruler and drawing method.
Great time saver. Thank you.
I like to do the method where you sew around all 4 edges and then cut on the diagonal both ways, faster and easier
I love this June Tailor ruler for trimming HSTs!
http://www.amazon.com/June-Tailor-Perfect-Quarter-Triangle/dp/B001TL2JIA
A problem I see with sewing all 4 edges and cutting on the diagonal instead is that you are then working with the bias when you sew them together. Becky’s way doesn’t involve those dreaded bias seams 🙂
Any formula or whatever to give me a specific size for HST?