
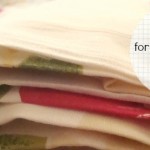
 To help me control the raw edges and ravel- I found 2 ways that you can fold your fat quarters. They are quick and easy. No need to re-iron {unless you are that sort of person}. Just fold and
  Open up the fat quarter and fold the sides to the center
Fold the other sides to the center
Fold in half and then half again
Nice little rectangle of a shape with all the raw edges tucked inside
Fold a Fat Quarter #2~
Open up the fat quarter and fold the sides to the center
Fold the other sides to the center
Fold in half and then half again
Nice little rectangle of a shape with all the raw edges tucked inside
Fold a Fat Quarter #2~
 Open up the fat quarter and fold in half matching up the raw edge at the bottom
Fold the side to the left matching up the raw edge at the left
Fold the left section to the right- the space is divided up into thirds
Fold the right section on top of the previous fold
Fold the top down- again the space is divided up into thirds
Fold the bottom section up- tuck the raw edge inside the folds of the top
Now this little cutie ends up in a square shape and the raw edges are tucked in kind of a pocket.
Not sure what sizes pre cut fabrics are? Clickety click here for a printable pre-cut fabric chart, free! and if you are feeling like you need to be a genious– How about a free printable chart all about fabric yardage– what size do you get that fabric cut!
See that cute fabric bin? Sew up your own with some quilt blocks! Fabric Bin Tutorial
Ideas for Fat Quarters
Open up the fat quarter and fold in half matching up the raw edge at the bottom
Fold the side to the left matching up the raw edge at the left
Fold the left section to the right- the space is divided up into thirds
Fold the right section on top of the previous fold
Fold the top down- again the space is divided up into thirds
Fold the bottom section up- tuck the raw edge inside the folds of the top
Now this little cutie ends up in a square shape and the raw edges are tucked in kind of a pocket.
Not sure what sizes pre cut fabrics are? Clickety click here for a printable pre-cut fabric chart, free! and if you are feeling like you need to be a genious– How about a free printable chart all about fabric yardage– what size do you get that fabric cut!
See that cute fabric bin? Sew up your own with some quilt blocks! Fabric Bin Tutorial
Ideas for Fat Quarters


I especially like the first fat quarter fold. I used to work at a fabric and craft store and we would do this to roll up our remnants (which were up to one yard). This is best for fabrics that are WOF. Leave your fabric folded, selvedge edges together. Measure your fabric and make a note on your wrapper. Fold your fabric to make a strip about 10 – 12″ wide by the WOF. Fold the selvedge edge in toward the folded edge. This will make sure there are no raw edges. You can then fold the folded edge in and roll up your fabric. We would tuck the wrapper in the fabric as we rolled to make sure it didn’t slip off, but these may be a bit short for that. Hopefully your fabric won’t get as much abuse as it would in a store… cats and kids and puppies, I’m looking at you… (My cat was using one of my upholstery remnants as a toy. Good exercise for her back legs, lol.)
The Swiffer containers that are 3″ x 5″ by abt 12″ are great for holding fat quarters. You can use a 3 x 5 index card to fold them, and the lids are clear so you can see what is inside.