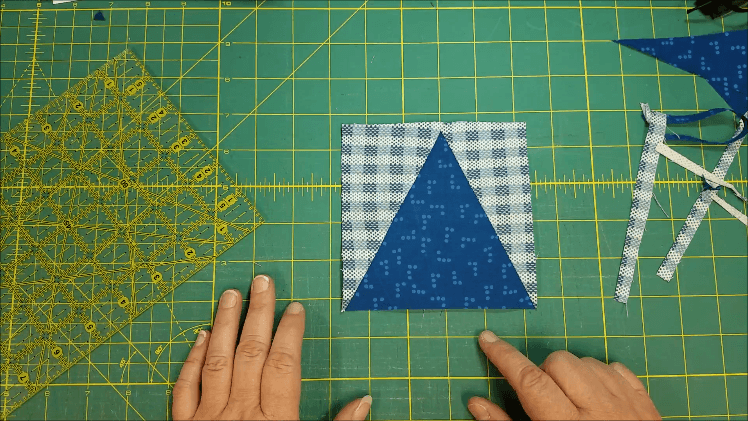
Learn how to sew up a fun quilt block that looks like skinny flying geese. Great for by itself or in a larger quilt block. Video tutorial instructions.
This is kind of a funky block and can be a little tricky when sewing it.
There are a few things that you’ll need to watch for so it turns out right.
Typically this block is put into a larger block. It’s not usually one that stands alone, even though it would be just fine by itself!
The measurements I used were just for the tutorial- you’ll need to watch the sizes you for the project you are making it for.
The quilt block size is 5″ unfinished

Materials Needed:
- Fabric for center of skinny flying geese
- (1) – 5 3/4″ X 5 3/4″
- Background for skinny flying geese
- (2) – 6 1/4″ X 3 1/4″
- Fabric: Coordinating fabric and optional scraps
- Tools: Rotary cutter, cutting mat, ruler, sewing machine
- Thread: Matching or contrasting
- Extras: Pins, iron, marking tools (optional)

Must-Have Tools for Flying Geese Blocks
1. Half‑&‑Quarter Ruler
Specialty ruler designed for flying geese and half‑square triangles—it calculates all required cuts and seam allowances for you
2. Glow Ruler
The light glows the ruler lines which allows you to really see the measurements. The bottom of the ruler features a metal strip that houses the lights. You simply turn the lights on or off – depending if you need them and for storage.
3. Flying Geese Specialty Ruler (e.g., Quilt in a Day, Creative Grids, Deb Tucker)
These make it easy to cut and trim geese units neatly. Popular choices mentioned by quilters include Quilt in a Day and Creative Grids
4. Rotary Cutter & Cutting Mat
High-quality rotary tools ensure crisp, straight cuts—essential for precise flying geese pieces.
5. Acrylic Quilting Ruler with Clear Grid Lines
A ruler with easily readable inch and half-inch markings is essential for measuring and trimming accurately.

Pointers For Skinny Flying Geese Quilt Blocks
- Use starch or pressing spray if your fabric is stretchy or slippery—this helps maintain straight edges.
- Double-check measurements before cutting—accuracy is key for this narrow block.
- Use a scant ¼” seam allowance to keep your points crisp and avoid cutting them off.
- Chain piece when possible to speed up your sewing and keep things consistent.
- Press seams carefully—either open or to the side, but be consistent throughout your block.
- Trim blocks after sewing to keep all units the same size and ensure they fit together nicely.
Skinny Flying Geese Video:
Skinny Flying Geese Tutorial:
- Fold the 5 3/4″ square in half and crease the top
- Open the square and cut from the right corner to the crease in the center of the square
- Repeat with the other side- cut from left corner to the crease
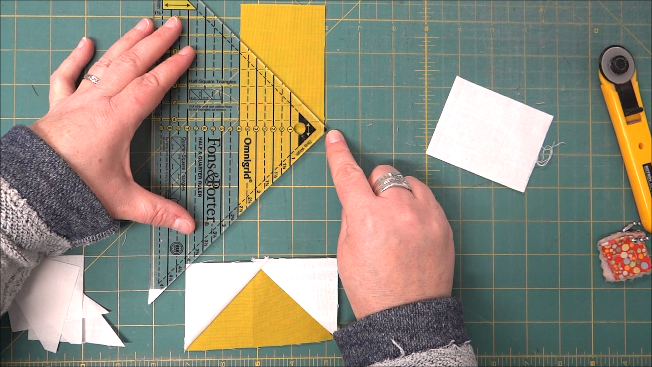
- Lay right sides together the background rectangle pieces
- Cut from bottom right corner to top left corner
- Lay right sides, the background triangle on the large center triangle – the tail of the background triangle will hang past the point of the large triangle. The top points will match
- Sew 1/4″ seam, open and press
- Repeat with the other background triangle, open and press
- Trim the block to 5″ x 5″ – making sure you have a 1/4″ seam at the top of the point.

Additional Flying Geese Resources
- 3-D Flying Geese Quilt Block
- Flying Geese Ruler and How to Use it
- Busy Body Medallion Quilt Along – flying geese border
- Turkey Tracks Mystery Quilt Along – flying geese units
- Flying Geese Units for the Summer Solar Eclipse Quilt Along
Frequently Asked Questions
1. What’s the finished size of this block?
The skinny flying geese block finishes at 5″ x 5″ (unfinished 5½”)—perfect for blending into larger designs
2. What fabric sizes are used?
You’ll need:
- Center fabric: 5¾” square
- Background (geese wings): Two rectangles, 6¼” x 3¼” each
3. Do I need to crease and cut the center square?
Yes—fold the center square in half, crease, then cut diagonally from both corners to create accurate triangles
4. What’s the best way to add the background triangles?
Lay each background triangle right sides together onto the center triangle, sew a ¼” seam, press, and repeat on both sides
Becky Jorgensen is the creative quilter behind Patchwork Posse, the Patchwork Planner and her online quilt group Patchworkers Plus. You can find her patterns in books, magazines, and her quilt membership. Gather your quilting supplies, organize your sewing space, explore the process of disappearing quilt blocks, or finish a free quilt pattern. I'll help you use what you have, finish what you start and make your quilting journey fun!
Follow me here: Facebook, Pinterest, YouTube


