
Learn how to make your machine binding look hand sewn. It’s the same process as binding your quilt, but you’ll be stitching on the top instead of the back!
There is a video tutorial as well as image tutorial to show you the steps and process so you can do it yourself.

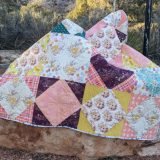
I’m not a mega fan of binding. It’s not my favorite process of the quilt making.
When I had a quilt that I needed to finish pretty quickly, but didn’t really want to hand stitch the binding down– plus, it’s a very large quilt! I found that this process works great.
Would I do it for all my quilts, no. But it does work nicely when you use this method.
The traditional machine sewn binding is pretty much the same process, you’re just working on the opposite sides as that method.
You need the following materials prior to starting this method. Simple and not any different than other methods.
What I did find is that the flat head pins are the best. They keep out of the way and don’t askew the quilt when you are stitching because the ball heads get stuck on the sewing machine plate. I did try wonder clips, but found they scooted and that the pins were more secure.
Materials:
Binding strips – the strips used in the video tutorial are 2 1/2″ wide X the length of the quilt.
Bobbin that matches the binding fabric
Additional supplies you may need:
- Bloc Loc ruler for squaring up
- Rotary cutter or a new sharp blade
- Cutting Mat
- Quilt Ruler
- Sewing Machine this brother is my favorite!
- Iron here or here
- Thread
- Bobbins
- Scissors
- Seam Ripper not my favorite thing to do!
How to machine bind like it looks hand sewn video:
How to machine bind like it looks hand sewn tutorial:
1. Sew the binding to the FRONT side of the quilt top
Fold the binding strip in half – wrong sides are inside, the right sides facing out.
Press the binding so you have a nice crease on the fold, the raw edges will line up
Line up the raw edge of the binding strip to the raw edge of the quilt

2. When you get to the corners- stop the stitch 1/4″ from the edge and remove from under the needle

3. Pull the binding strip straight up from the un-sewn raw edge, making a 45 degree angle

4. With your fingers underneath making sure the binding strip doesn’t get pulled out of place, fold the binding strip back down

5. Start stitching along the next side, starting 1/4 inch from the corner

6. Repeat at each corner until the binding strip has been sewn to the quilt top
7. Turn the quilt over so you are working on the backside of the quilt. Fold the binding to the back 1/8″ past the stitch line to attach the binding to the top

8. Using a long straight pin with a flat head, pin the binding from the inside to the outside edge of the binding- make sure you catch the layers you need to secure


9. Continue this process for 12 inches or so
10. Change your bobbin thread to match the color of your binding. The top thread should match the most dominate color of the quilt top on the edge

11. Turn the quilt back over so the top is facing up
12. Starting at the first pin, stitch in the ditch to the 3rd to last pin

13. Continue pinning the binding on the backside, making sure you are past the stitch line
14. When at the corners, fiddle with them so it makes a mitered corner look

15. I pull on one edge straight and then fold the other edge down making the 45 degree angle miter

16. Using the long pin, pin the corner miter from the inside out- make sure you catch the layers to secure it

On the front of the quilt, the stitch in the ditch should really be hidden. It will kind of nestle down into the seam of the binding and disappear.

On the back of the quilt, you’ll see the stitch line on the binding right along the edge


Isn’t that pretty slick? Have you tried that method before of have a quick tip to give? Share it in the comments!
For more tutorial on binding, check out the binding your quilt posts here.


I just want to tell you how much I enjoy your site. Your explanations and videos keep me motivated. I am a relatively new quilter, age 84 years and need that extra oomph to keep going. I am making table runners for my girls for Christmas as I am starting small to work forward. Thank you. Kathleen
thank you Kathleen- I’m so happy you are inspired to continue quilting! I’m sure they will love the gifts you give- and that’s awesome that you are sharing them!
I’ve been binding this way for 20 years or more. I donate my quilts to kids and know they get a lot of ‘love’. No hand stitches to ever come loose.
Karol
thank you for sharing your experience with this process Karol- Good to know it works long term too!
Thank you for the great directions on the binding.
How can you be sure you are catching the binding on the back?
What is the stitch length and thread weight you use to make it look hand sewn ?
Hi, I’ve tried stitching binding to quilts both on the front and the back. With both methods I recommend the following: once the binding has been attached and you fold it over to the ‘other side’, carefully press that folded-over edge of the binding with an iron. It creates a neater edge aligned to the edge of the quilt and makes it easier to hold the folded over edge in place with pins or clips.
I used the thread that was already on the machine – didn’t change it! Stitch length was a little longer than normal. Maybe a 3. Because of the layers and bulk it made stitching a bit easier.
great tips – thanks for sharing them!
I frequently machine bind my charity quilts. I sew to the back and flip the binding to the front. I carefully lightly spray baste and iron in place. A few clips to hold corners in place. Stitch length a 3 and I am good to go!