
This simple apron tutorial shows you how to make one on point with a pocket. Great for kids or enlarge it for adults.
It’s a simple apron tutorial you can sew in an hour!
It really doesn’t take long and cooking can be fun…but cooking with little kids can be funner!
This apron is just the right size for the little helper in your kitchen.
Need it bigger? No problem, make a few adjustments to the fabric you are starting with.


Simple Apron Tutorial- for kids!
materials needed:
2 half yard pieces of co-ordinating fabrics
2 big buttons
Cut:
1 square 16X16 inches. This is going to be the center of the apron.
1 square 16X16 inches. This is going to be the center of the apron.
2 strips: 1 is going to be 3 X 16 and the other is 3 X 18 1/2 inches.
1 big square 18 1/2 X 18 1/2 square for the back.
neck strap: 2 strips 1 and 1/2 inch X 18 long.
pocket: 2 6 inch squares. one front and one back fabric.
tie strips: 4 strips 3 X 18 inches
Step 1:
Sew the 3X16 inch strip to one side of the center square. Iron.
Sew the other 3 X 18 1/2 inch strip to the corner. The 2 strips will be touching at the end.
Step 2:
Cut 4 strips –3 X 18 (you could make this longer if you would like).
layer 2 of the strips right sides together. At the end of the strap fold over one corner to meet the side. Press this to get a crease line. Then sew down each side and at the end stitch on the pressed line. This will give you a cute pointed end on the strap.
Trim the corner and extra fabric. Turn right sides out and press flat.
yay- cute straps!!!
Step 3: Pin straps to the top of the sewed on strip. I used 2 pins so they wouldn’t shift. Repeat for other strap.
Layer the big 18 1/2 Square back fabric right sides together with the front.
Sew all the way around leaving a gap to turn. Make sure you don’t sew those strap ends into the edge!!
Trim the points, and turn it. Poke the points out and iron it. Make sure you iron the turning hole also. This will get sewn closed in the next step.
Step 4:
Sew all the way around the apron 1/8 of an inch from the edge. This will keep the apron straight when you wash it plus it will close the turning hole. If you would like you can do an second stitch 1/4 inch inside of that one for a double stitch. Cute.
Step 5:
Take the corner opposite of the pieced corner and fold it down 6 inches. Measure on the edge when turning. You will be folding the back of the apron to the front. Pin in place so it doesn’t move.
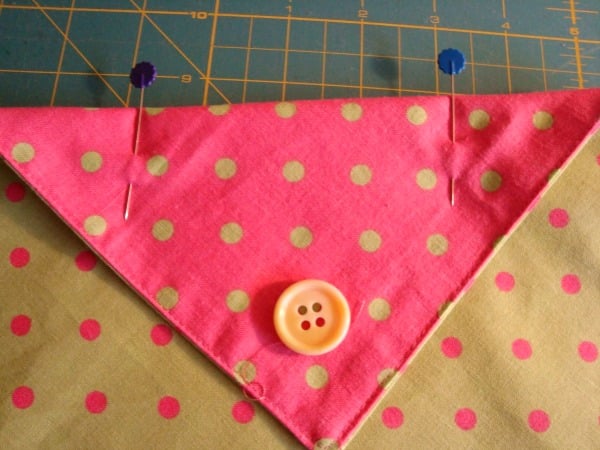
Take one button and place in the corner. Then stitch in place.
Step 6:
The neck strap. Take your 2 strips for the neck- lay right sides together and sew around both edges and one end. Trim your corners and turn right sides out. Iron it flat. Tuck the one unfinished edge inside the strap and iron down. Then sew across the opening.
The strap ends are then pinned to the top of the apron, just below the flap. Sew a little rectangle to get that strength at the ends. Repeat for the other side, making sure you don’t twist it!
Step 7:
Pocket. Layer the 2 squares right sides together. Sew all the way around leaving just a bit of space to turn it right sides out.
Trim the corners and turn it right sides out. Iron flat and stitch again all the way around 1/8″ for a nice finished edge.


Take one corner and pull the back to the front —just like the apron body—.
You may choose to match the apron body fabric or to make it the contrasting back.
Pin in place and pick a spot for the button.
Sew in place.
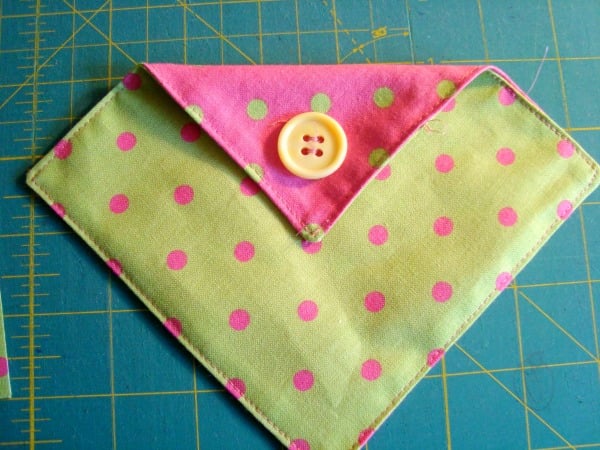
Step 8:
Pin the pocket just above the bottom sash. Sew all the way around the pocket leaving just the top flap open for little hands to get in.
You are finished. Wasn’t that easy? Little fabric, little effort….big reward!!
Wrap it with some little cooking goodies and there ya go.
If you end up making one please share some pics!!
edit: i didn’t mention the size. this is for a 4-7 year old.
My youngest was the model…. no pics. You could easily start the center at a larger size and then follow the instructions for the construction.

A few more simple apron tutorials that might work for you too~


Oh that IS easy, I love it! I’ll be linking.
Thank you for such a fabulous pattern!!! My son just loves the apron I made him…we bake all the time and he has been asking for one!!!
Heather
I love this pattern and decided to make bibs from it. I start with a 12″x12″ piece and the trim is about 2.5″. The straps are 21″ long. For the neck strap, I start with a 21″x2.5″ piece and sew it in a tube. After turning pressing it, I insert a 14″ piece of elastic and sew across the ends of the strap so the elastic is attached. I then attach the neck band to the apron similarly to how you did. This is an awesome neckstrap because it stretches to fit over the head, but also fits when it is on. Everyone loves my “cover all bibs.”
Sally (also lds) from Kennewick, Wa
sally i love that comment and change to make it just a bit smaller and bib!! perfect stretchy neck too. i will have to give that a try when i need one. thanks for sharing.
Great tutorial!! I made one in a little over an hour tonight!! So cute…thanks for posting.
it does make up totally quick and cute doesn’t it! love that.
What size do you think an adult pattern would start with?
you can kind of audition it– hold a piece on point around 1 yard. i think that might be close. remember that the ties can help it meet in the back-
I made this apron for my grandson. I used denim and Disney Cars fabric. It is adorable and he loves it. The pattern and tutorial are perfect.
carla that sounds adorable! you should send me a photo 🙂
What size should the front square be, for an adult size?
THANK YOU for this tutorial! I bought a Simplicity pattern for an apron that is WAY too labor intensive to try again. I think this apron is so striking and would make wonderful gifts for friends. Like Kate, I am not sure how much fabric I would need for an adult size. I’m terrible with math…does anyone have any suggestions for how much I would need. I hate to try this and realize it wouldn’t be big enough.
I don’t sew very much, but I WAS able to make 3 of the 4-corner aprons using your wonderful tutorial. YIPPEE SKIPPY for me! Thanks so much for sharing. It makes such a stylish apron, and the friends who recieved the ones I ‘ve made were very impressed! ;-D
Karen that is wonderful! glad it was a good one and that you made so many- lucky recipients. 🙂
I just made this for my grandson using fabric printed with all types of sporting balls …would love to show u a picture of it
I got this same pattern from craft warehouse a few years back and made a couple. They are quick and easy and so darn cute. Thanks for sharing!
Hola como estas, ese delantal es hermoso y las niñas les va encantar. Lo malo que yo veo es que no entendi las medidas, eso de pieza, plaza o pulgadas. Hubiera sido mas facil en centimetros, que es mas estandar. Muchas gracias, con amor. Ofelia vidal.
Que lindo gracias por compartirnos el tutorial
Hello, Thank you for the tutorial on the kids apron 🙂 I just have one question I am a bit confused on.
where it says to Step 1:
Sew the 3X16 inch strip to one side of the center square. Iron.
Sew the other 3 X 18 1/2 inch strip to the corner. The 2 strips will be touching at the end. I am confused on the 3 X 18 1 /2″ it will hang off one end due to it being longer???
Thank you please HELP ME someone.. 🙂
Hi,
For the four corners apron, the square 16 x 16 is already with the inseam included? If not, how much do I have to add to the fabric before I cut it? Please advise. Thank you.
I’ve been looking for this pattern for a long time. Thanks for making it look easy to sew!