
Hi, it’s great to be back! Wendy here from Sugarlane Designs. I’ve had such great feedback after my last contributor tutorial, I must say a HUGE Thank you to you all! I’m so glad you enjoyed my monogram tute…….today we’ll go a little bit further and delve into something a little different.
Before we do, if you haven’t yet read my last tutorial, here’s a little bit about me: I’m an avid stitcher and patchworker and I classify myself as a stitcher rather than an embroiderer as I don’t focus on the ‘fussier’ embroidery techniques but rather use basic stitches such as back stitch, satin stitch, blanket stitch, french or colonial knots, straight stitches and running stitches in my designs, just to name a few.

Up, Up and Away!
You will need:
- 8 inch square of yellow dot background fabric
- Stitchery Design
- Fat eighth Pink/Cranberry fabric
- 6 inch square of medium weight fusible interfacing Parlan/Pellon
- DMC 6-stranded Cotton Embroidery Thread – 1 skein each as follows: (353) Peach, (413) DK Pewter Grey, (517) DK Wedgewood, (601) DK Cranberry, (906) MD Parrot Green
- Cottage Garden Threads I skein each as follows: (313) Compost, (603) Pansy or similar variegated 6-stranded threads
- 9 crewel needle
- 6 inch embroidery hoop
- 5 brown/Sepia Pigma pen
- Lightbox (optional)
- Two size 12 black seed beads
- Four size 14 blue glass seed beads
- 12 inch length 3mm wide ribbon
- 7 inch square heavy card
- Craft glue
- Frixion pen, pencil
- Microbrush or similar
- Rotary cutter, ruler and mat
- Embroidery scissors and Paper Scissors
- Pinking shears
Stitches used: Backstitch, Satin Stitch, Straight Stitch.
**NOTE: This design uses two strands of thread throughout.
Finished Size: To fit a 6-inch embroidery hoop
Download stitchery design and trace onto your fabric using the method you prefer.
Let’s begin:
Tension the traced embroidery in the hoop, if desired. This is a recommended step as it helps with keeping the stitches taut. Working without a hoop can result in puckered fabric due to uneven tension. As a note, in my previous Patchwork Posse tutorial you’ll find step-by-step instructions to stitch each stitch.
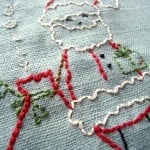
Using Cottage Garden thread, “Pansy”, backstitch the dress outline, including the collar and folds in the skirt. You probably know by now Cottage Garden Threads are a favourite of mine, but as they’re Australian, they may be difficult to source outside of the continent. Use any 6 – stranded variegated thread in similar colourings to get the same effect.
Satin stitch the belt and hair ties using DMC Cranberry. Using the same colour, backstitch the girl’s mouth. As it’s a tiny feature, use tiny backstitches to create a smooth curve. It’s also important to ensure your needle goes back into the same hole that your last stitch came out of to keep the lines true.
Complete the girl’s face outline, nose, arms and hands using the Peach thread. Again, when you are stitching small features, you will need to use smaller stitches to prevent the curves from becoming angular. Smaller stitches create smoother curves.
Her hair is backstitched using Cottage Garden “Compost”. Again, if you cannot get Cottage Garden threads, you can use a similar variegated brown to get the same look, or personalise it by stitching the hair a similar colour to the person the stitchery is for.
Use the MD Parrot Green thread to backstitch the balloon. The balloon’s string is backstitched in DK Pewter Grey with three straight stitches to create the ties around the neck of the balloon.
I used one strand of this same thread to attach the 2 black beads for eyes and the 4 blue beads for buttons. Simply knot the end of the thread and bring it up from the back in the appropriate position, thread the needle through the bead (rather than trying to pick it up and put it on the needle) and stitch back down through the same hole the needle came up through.
I will be showing you more in detail Thursday –how to add the beads and how to make your hoop super cute!
Leave a comment below letting me know what you think? (please be kind now!?!) I will be back later this week with tips on how to individualise your stitcheries. In the meantime, find out more about me at my intro post and then come and visit me at my place, Sugarlane Designs. You can also find me on Instagram, Facebook, Pinterest and Twitter.
xox Sugary hugs :o)


This is such a cute and easy pattern. I’ll definitely try this out.