
Do you sew a mile a minute?
I totally do! The table shakes and all the fabric bits are flying everywhere. The fabric bits is where it begins.
I don’t know about you, but I find that I keep a lot of little bits. Fabric pieces that get cut off because they are too small for the project I am working on….or the project is over and now I am left with fabric scraps.
Whatever the reason I end up with this pile of good fabric…..if it only was bigger!
How about we figure out how to sew them a mile a minute and get them large enough for a project.
Today we will work on that together-

The process can be quickly broken down to– you sew a small piece to another piece of fabric. You iron it open. You sew this new pieced piece to another fabric scrap. You iron it, and continue until it’s as big as you’d like.
I love this way of sewing. There is no rhyme or reason to it. You aren’t concerned that your points will be picked at {by others who have the eye to quickly react to non matching points}, you aren’t worried about the fabric too much- who cares if the stripes are all crooked! That sort of thing.
It is the kind of sewing that can become mindless. You are just feeding that sewing machine as quick as you can, without thought.
So let’s get started!

- a big pile of fabric scraps- sizes aren’t measured here. Little bits, medium bits, large bits. They can all work together.
- iron
- sewing machine
How to Sew a Mile a Minute:
1) Iron all those little bits of fabric scraps until they are all flat and wrinkle free
2) Match two pieces together at one end -right sides together
3) Sew them together
4) Without snipping your thread, grab another 2 pieces and sew them together
5) Continue this process until you have a big long line of sewn pieces, all connected by thread

6) Snip the thread in between the pieces and iron those really well

7) Using this fresh set of pieced parts…..grab two and sew them together
8) Repeat, repeat, repeat
You will find this mile a minute sewing process quick and easy! Before you know it, your little pile of out of control fabric scraps are large enough to move onto the next step.
Sew a Mile a Minute:
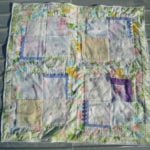
1) Decide on how large you would like to cut these– for the example in the tutorial, I went with 6″ X 6″ squares
2) Lay the ruler on top of the piece and trim the edges to the correct size

3) Continue this process until you have all the blocks cut

* if you find that you are small on one side, take it back to the machine and add another scrap. Then cut into the quilt block
When you are sewing like this don’t worry about the seams, or points. You will be cutting a few of them at some point. Don’t cry over it, just get to the final product which is a cute quilt block that you can now use for a project.
If you are using your scraps you might find that they are crazy in color! Maybe too much to handle. A great way to combat this is to add sashing between the blocks to calm down the business. Just have fun and watch your scraps slowly get used up.


Discover 10 more Quilting Hacks so you can sew faster!
Sew up a plastic bag holder using the technique.
String Quilting – a little similar to the mile a minute
Quilting 101 hints & tips
Q & A- Have you sewn using this method before? What suggestions do you have for us?


This looks like fun!! Will give it a whirl soon.
I’ve done this a number of times and used the fabric I pieced together for a number of different small projects. I love the serendipity factor!
I’m new at quilting, but would like to get started. This seems like a good way to try it and use up some scraps in the process. A question–should all the scraps be the same type of material? i.e. all cotton? Or doesn’t it matter?
Love this! I once made a quilt like this about 25 years ago when I was a bored teenager with free reign over my mother’s sewing machine and a very looooooong summer. It’s still my favorite quilt. Sometimes we worry too much about being matchy-matchy and straight lines etc. I sense a new quilt project coming on . . .. 🙂
What a great way to use up those ever increasing left overs will give this a try
Much better then cutting up good fabric all the time
Thanks for the tutorial
419 Riverside Dr
I do separate my scraps when a theme is involved…holiday kind of stuff doesn’t go in with the regular fabrics. Two years ago I made trick or treat bags for the DGGS with those scraps and appliqued jack-o-lanterns on them. I was told they were a big hit.
Ohhhh, this is also a great way to use up left over bobbin thread.
Wow!!! this looks like fun and it doesn’t have to be perfect!!! I am new at quilting. Thanks for sharing how to’s!!! Your love of quilting comes through.
Was just looking at a crazy pile of scraps and thinking of doing something like this! Thanks for the tips! My colors ARE crazy so I would certainly need to break it up with some sashing.
I did this using red and dark pink scraps, then added yellow and gold appliqué flowers over it for a small wall hanging.
N4015 North 29th Rd
I love this! Do you by chance have a picture of the finished project or of another one you’ve done using this method? I’d love to see the whole picture to get a better idea. Xo
i am new and have been doing this since day I. I love this look!
Awesome way to do something with all those scraps!!! Thanks!!!
I made one a few years ago. It was too busy. I used all the fabric that my children loved, some old clothes that were cotton and a lot of love. I used blue jean sashing to break it up. It is a very warm quilt. I also used blue jean backing. We live up north so it is very cold in the winter. My son is a trucker and uses this blanket to keep him toasty warm.
the blue jean sashing was the same width as the blocks it looks like little windows of light it really turned out nice.
Absolutely loving this idea! Will try it out soon! X
This looks like so much fun!
I love this method– I call it improv jazz quilting. I love using up scraps to make colorful patchwork blankets to donate to the Seattle Children’s Hospital (I am a member of Katie’s Comforters Guild).
No hablo inglés por lo que solo puedo seguir las imágenes y me resulta bastante dificil. ME ENCANTARIà SABER SI PUEDEN TRADUCIR LOS TRABAJOS. GRACIASSSSSSSS.
Thanks for the tutorial. This is a much better way of sewing crumbs together than I’ve been using, although the end result is the same.
I have try this method, but I wonder how will the perfect match each other? I found that they are not easy to be attached because they have different size. Thank’s for the tutorial
I made three of these quilts. Squared all the blocks, but when sewing together equal blocks on both sides as well as top and bottom, my quilt was out of square. Any hints on sewing blocks tog that will prevent this. Also would recommend donating these quilts to your local womens shelter, they will be appreciated.
i am in the process of doing this kind of quilt, I call it my crazy quilt. I enjoyed putting the pieces together. My blocks are 10×10. I squared each one and i am putting a yellow trim around each block. I can’t wait to see it finish. Its very colorful and modern.
I plan to try this soon – great idea
I’ve done this and it’s loads o’ fun. I have found that it helps to sort the scraps by general size. It makes it easier to join them sequentially (e.g., 2 smalls together, then 2 smalls + 1 medium, then 2 smalls + 1 medium + 1 large, etc.). In this way, I don’t have to sort through my scraps while I’m sewing and fret about if I have a scrap size that’ll fit onto the block I’m building. I usually use 100% quilting-weight cottons but sometimes cotton/poly blends in the same weight as quilting cottons have found their way in. I like the idea of alternating denim patches with the “crazy” blocks. And why COULDN’T you mix fabric types? That’s what traditional crazy quilts did (satins with lace yardage with velvets and such). Imagine the possibilities!
I love quilting thus is great I have a large bag of scraps I can’t bear to throughout now I don’t have to thanks.
I have just begun to sew this block and they are so fun to do!
Talk about stepping out of my comfort zone! Love the way this looks, but I tend to be more of a “precise” piecer! Am giving this a whirl today!! Fingers crossed… :0)
Lavina – it is totally stepping out of the comfort zone, that’s for sure. Good luck and you’ll do fine. It’s all about having fun and imperfection is they ‘key’. 🙂
Hi. can you do this with a serger or will that add too much bulk to the pieces when you go to cut?
Things like this make great sewing machine covers, tote bags or things like that. I am cutting all my scraps into 2″ strips (light and dark) these are going to be used to make log cabin blocks.
I just found your site. Thanks you for sharing with us. I have a big stash of scraps. Gonna try this for sure. : )
Fabulous validation of the way I have been quilting since I started. My fabric came from a woman who had moved on to painting so I had all kinds of colors, sizes and shapes so it’s how I started. To this day I try to match my pieces so I don’t have to cut. All “crazy” style, all the time in LyndaLand. Thanks for showing us how to do it.
I am a fan of mindless sewing especially when the rest of my life is full of stress. I have not yet completed a scrap quilt using this method but will do so soon.
I was watching the video and you mentioned, what sounded like to my hearing impaired ears, and YouTubes, captions, as “washing tape”. When I heard that, I was thinking of the fat quarters I just washed, w/o pinking, or sewing, that tangled terribly. Tape on the edges would prevent that, I would think, but I sure can’t use scotch, or any of the other tapes I have. Thanks!
It may have been washi tape. It isn’t as sticky and can be used multiple times. Doesn’t leave any sticky behind either.
I used this to make a colors book for toddlers. I made one block of fabrics with mostly red, one green, etc. I fancied it up a bit by making sure at least one block had a design they could recognize, one red block had apples, etc. Then I stitched them into a cloth book.
Thank you Becky for making a light come on. I have been getting classes from Craftsy on FMQ, Ruler work and Walking foot quilting. It always bothers me to have to use precious big pieces of fabric to make practice sandwiches. I will try this method and it will give me lots of areas to try different stitches in. I can then use them for mug rugs or place mats when finished. If they are mismatched ,who cares, I won’t mind the coffee rings that get on them and don’t come out in the wash.
Just wondering on Nancy’s comment…I don’t see a reply. Does the material have to be all cotton or can it be a variety of material?
It could be anything. Just keep in mind when using them the washing of it. The cotton will shrink a bit and the poly-blend won’t. After a wash you might find a few ripples or waves because they aren’t all shrinking at the same rate. If this is for a car or picnic quilt to be used a lot and not really worried about that, then it will be fine.
I have bags and bins full of scraps never know what to do with my scraps scraps is this easy to do I have a learning disability and struggle with new ideas I try to stick to what I know work’s for me then I get board and want to to do something different, how do I start with this is there a video to show me how to do this project .
This is the best idea! Easy to do and so fast. Thanks,
hi there love yr tutorial i too do something similar have just finished 2 black and white scrapppy s… so many leftovers mine were 12 ins finished put sashings and coloured cornerstones to give it interest i still have so many ill not likely ever get to use them all
I like the idea of segmenting all of your work into blocks. That makes sense considering you want to make sure that quilts are organized. I’ll have to consider getting a quilt made from a professional.
Finally! I am not alone!
All my quilt tops start like this and I run screaming from any organized attempt at quilt making.
I like doing this, but i sew them to squares of batting, i find it easier.
This is one of my favourite ways to sew a block.
I could see these blocks made into potholders! 6×6 or even a little bigger would be a really nice size–guess I’ll get busy–I have TONS of scraps that can be used–and I think I’ll sew them onto a thin batting to be able to use the triangular pieces and the strips as well. Thanks for the inspiration!
I don’t quilt but my Husband does and he has given me over 4 big totes of scraps. I was trying to think of a way to use these and this looks like something I can do. He has started using some of the bigger scraps but still has lots of smaller ones.
I sew my scraps together haphazardly, squaring off as needed, especially after completing a quilt top. Then, I may make a baby quilt or lap quilt, but most often, I use these new pieces to put on the back side of the quilt just completed, especially if the backing is just a little too small without adding or buying more material.
I love this idea so much more than organizing all those scraps I have been putting in tubs as I finish a quilt. There is always scraps. This is definitely a “try it” method.
I’m in the process of making a quilt that has every block a different pattern. This will definitely be for one of them. My quilt is in all blues and whites so this should work out well. Thanks for sharing a great idea!