Learn the quilt as you go method while sewing up a zipper pouch. Super cute and useful for packing around a sewing project, snacks or whatever.
A Zipper pouch comes in so handy…especially during the summer time. I find myself in the car a lot. Having this little pouch around, I can stuff it with a sewing project, a snack, or whatever. A quick grab and go pouch.

With this pouch, I though I would try something new. Quilt as you Go technique.
I have become a big fan of this method. By the time you are finished with the quilting and piecing, you, the back is finished at the same time.
I love that! It saves a lot of time and I am all for time savers. Using this method, the inside or lining of the bag has a quilted look.

All the raw edges or seams are covered by continuous binding. It’s a little bit tricky to get on, but I love how it borders the fabric and stands out.
This would be a great way to add a little bit of color pop and fun to the bag.

Quilt as you go technique:
For additional help and information on the quilt as you to technique and method, you can visit this post. There are video tutorials and images walking you through the whole process.
You will also find more projects that you can make using this technique.
Zipper Pouch Quilt as You Go technique
Finished size: 9 X 7
Materials Needed:
Batting- 9 x 15 & 7 X 4
Lining- 9 X 15 & 7 X 4
Fabric- can be scraps, strips, or chunky sizes. Pick it up at Connecting threads or Fat Quarter Shop
9 zipper
Bias Binding- 2 1/2 X 66
Supplies you may need:
- Rotary cutter or a new sharp blade
- Cutting Mat
- Quilt Ruler
- Sewing Machine this brother is my favorite!
- Iron here or here
- Thread
- Bobbins
- Scissors
- Seam Ripper not my favorite thing to do!

Quilt as you go instructions:
1) Layer the batting and lining
2) Place one piece of your fabric on top of the batting and quilt. The quilting can be circles, meandor, straight lines, or whatever you’d like to sew.
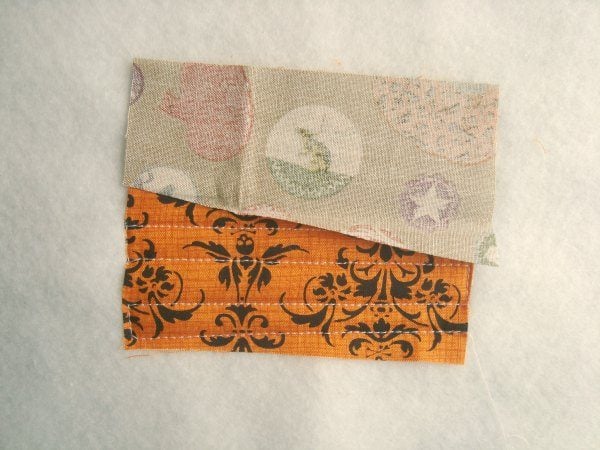
3) Place the next fabric on top of the first one- right sides together. Sew along one edge.
4) Fold the fabric back, iron and then quilt again. This time you can vary the direction of the straight lines or design.
5) Repeat until the whole piece has been covered with fabric and quilted.

6) Repeat these steps with the two small size pieces.
7) Trim the large piece to 14 1/2 X 8 1/2 and the two smaller pieces to 6 X 3 1/4
Zipper Pouch Instructions:
1) Cut your side pieces using the diagram below:
2) Using a 1 1/2 bias binding, hem the top edge of the piece. Trim the excess hem. Repeat for other side.

3) Mark the center of the bottom of the sides and the center of the bag piece {the long way}
4) Pin the pieces together matching up those center marks.
5) Continue from the center and pin the whole side piece to the bag piece you will be matching up the wrong sides! The raw edges will be exposed until the binding is sewn on.
6) Sew the sides to the bag- there will be a lot of strings and it will look kind of messy.

7) Sew your zipper to the top edge of the bag I know I am sewing with my zipper the wrong waybut I like my stuff on the left side of the needle when I sew. 🙂 Sew this with an 1/8 seam. You will be sewing a binding on later and don’t want this stitch to show.

8) Take your binding and cut it to 59. Make sure you fold this binding in half and iron well. Sew the ends together.
9) Sew the binding to the bag. I sewed mine to the inside of the seams and will hand stitch the outside of the hem. When you get to the corners, treat it like a corner on a quilt. Stop sewing 1/4 from the point, fold the binding then continue sewing. Because the bag is smaller and it’s a bit tight, take your time. It will be tricky, but will turn out fine. Anything that isn’t perfect or if there are little holes showing later, you can hand stitch these areas to close the gaps if needed.

10) Fold the binding to the right side of the bag and hand stitch.

11) Miter the binding at the corners. Fold binding down and straight across- off of the side.

12) Fold the next side of the binding down, making a miter in the corner

13) Continue stitching by hand until you reach the end.
WANT TO REMEMBER THIS? SAVE THE HOW TO MAKE A QUILT BLOCK ON POINT TO YOUR FAVORITE DIY PINTEREST BOARD!

More Zipper pouch fun:
Becky Jorgensen is the creative quilter behind Patchwork Posse, the Patchwork Planner and her online quilt group Patchworkers Plus. You can find her patterns in books, magazines, and her quilt membership. Gather your quilting supplies, organize your sewing space, explore the process of disappearing quilt blocks, or finish a free quilt pattern. I'll help you use what you have, finish what you start and make your quilting journey fun!
Follow me here: Facebook, Pinterest, YouTube


i cannot find the link for the pattern for the quilt as you go zippered pouch
cannot find the instructions for this project zippered pouch
“Head on over and check out all the details” (it is highlighted in blue) It is located above the comments.
I love this pouch! Thanks for the tutorial♡
Click on the RED “Head on over and….” It will take you to the tutorial
“Head on over and check out all the details.” link leads to no instructions.`