With the movie Paddington the Bear coming out it reminded me that I had a pair of lonely bears sitting about the sewing cottage that were ready to go, but were never shared! So, today they are here and are for free. No sense in hiding him from anyone…they need to be made and snuggled!

The original pattern was adjusted just a bit and then made with minky fabric. I used a minky that had a swirl pattern which looks great! You could use furry fleece or flannel or whatever you have on hand.
The arms and legs are sewn into the seams making him pretty kid friendly. You could substitute the button eyes with safety eyes if that is a concern for you.
Materials Needed for the bear:
1/3 yard minky or fake fur for the body, arms, legs
3″ X 3″ brown for the muzzle
polyfil stuffing
2 buttons- eyes
needle and thread
Download the pdf file for this project here
finished size: 17″ tall

Paddington the Bear Instructions:
1) Download the pdf file for this project link above
2) Cut out fabric pieces
3) Arm– Lay right sides together
4) Sew around the arm leaving the top open for turning
5) Turn right sides out and stuff firmly

6) Repeat with the other arm and two legs
7) Repeat with two ears- don’t stuff
8) Pin in place the mouth of the bear and stitch with machine or by hand — you could put a little bit of stuffing in there to give it more of a muzzle look.
9) Pin in place the ears, arms and legs- stay stitch in place. For the legs- I lined up the seams so they are in the front and back. You can choose how to place the legs if you like the pigeon toed or out. The arms are lined up along the side and the ears are pinched in the middle to give them a little bit of cuteness.

10) Lay the body together- right sides facing
11) Sew around the body leaving and opening along the top of the head for turning
12) Snip along curves and turn right sides out
13) Stuff firmly
14) Stitch eyes in place and nose detail

15) Hand stitch the opening closed with a ladder stitch


It’s like he’s waiting for someone to come home and give him some luv’s……

If you are making yourself a fun little set– here is the book collection for Paddington:

Now that he’s all made, there are a few things that Paddington the Bear loves— they would be his hat and his coat.
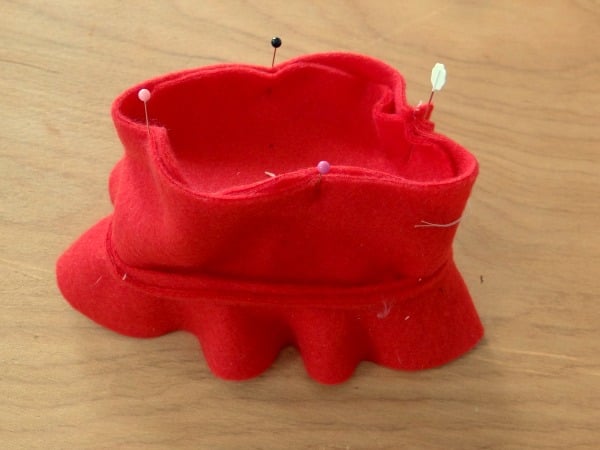
Paddington Bear Hat Tutorial:
Materials Needed for the hat:
Red fleece 15″ X 15″
1) Cut out the pieces using the templates
2) Cut a strip of fleece 3″ X 14″ and sew the ends together to make a tube
3) Pin this to the rim of the hat and sew. The stretch in the fleece will help with making these fit

4) Pin the oval to the top of the hat- right sides together and sew

5) Snip threads and turn right sides out

Paddington Bear Coat Tutorial:
Materials Needed for the coat:
Blue fleece- 25″ X 15″
buttons or toggles
rope
1) Cut out pieces using the template
2) Pin the front pieces to the back piece at the shoulders. Sew along the top of the shoulders

3) Open this piece and the arms in place -right sides facing and sew along arm hole. Repeat for other side

4) Fold coat and line up the sleeve and sides. Pin and sew along the sleeve and down the side of the coat. Repeat for other side
5) Hem the whole coat….along the bottom, in the front openings, the neck. I folded the hem once 1/4-1/2″ then sewed.

When you get to the end, fold the fabric and then continue sewing. The hem around the neck might be smaller than 1/2″. Hem the ends of the arms also.

6) Sew the buttons in place. For the loops- cut 2– 3″ pieces of string or rope. Fold in half and stitch down to the front

Suit Paddington up– he’s ready to go!


Check here for more dolls and plushie tutorials
Becky Jorgensen is the creative quilter behind Patchwork Posse, the Patchwork Planner and her online quilt group Patchworkers Plus. You can find her patterns in books, magazines, and her quilt membership. Gather your quilting supplies, organize your sewing space, explore the process of disappearing quilt blocks, or finish a free quilt pattern. I'll help you use what you have, finish what you start and make your quilting journey fun!
Follow me here: Facebook, Pinterest, YouTube


He is sooo cute!! I’ve got a Craft Gossip post that links to your pattern here:
http://sewing.craftgossip.com/free-pattern-paddington-bear-softie-with-his-hat-and-coat/2015/01/10/
–Anne
Are the seam allowances 1/4 inch?
Thanks,
Deborah
Where is the pattern for the jacket arms?
Looking for the measurements for the jacket arms.
I thought … wow! This is great. I can make a costume for my granddaughter’s bear to look like Paddington. Made the hat. Great! Started on the coat … and there’s no measurement for the sleeves. Apparently others have asked but I see nothing on the site to provide the needed information. Wow! This isn’t so great!
I would love to make the Paddington Bear but I can’t get to the pattern after logging into the library.
How do I get the sleeve template? The tuturial says to attach sleeves but no template or measurements to use for sleeves.
HELP PLEASE