Hang a quilt with corner hangers! Perfect for mini or wall hanging quilts. Simple to do and they work great. Quilt doesn’t droop!
In this post, I’m excited to share with you everything I’ve learned about using corner hangers to hang quilts. Whether you’re a seasoned quilter or just starting out, I’m sure you’ll find these tips helpful for showcasing your beautiful creations.

Types of Corner Hangers Available
There are several types of corner hangers available, each with its own benefits:
- Metal Corner Hangers: These are incredibly sturdy and can support heavier quilts. They’re often made of stainless steel or aluminum and provide a sleek, modern look.
- Plastic Corner Hangers: These are lightweight and easy to install. They come in various colors and can blend in with the quilt or wall.
- Fabric Corner Hangers: These hangers are gentle on delicate fabrics and can be sewn directly onto the quilt. They’re great for smaller, lighter quilts.
Learn how to hang a quilt with corner hangers
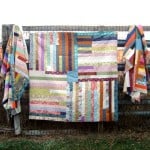
Hanging quilts can be a tricky thing! They sometimes don’t lay quite flat enough and are lumpy and bubbly around the top.
Today you’ll see how you can make some simple corner pockets that will hold a dowel or a stick across the top. These are perfect for solving the droopy middle when you hang the mini or wall hanging quilt.
Quilt Hanging Methods Over The Years
Quilt hanging methods have evolved significantly over time. Initially, quilts were draped over furniture or pinned to walls, which wasn’t ideal for preserving the fabric. As quilting became more popular, quilters began searching for better ways to display their work.
The introduction of quilt rods and sleeves was a major step forward. Quilters could sew a sleeve onto the back of the quilt and slide it onto a rod, creating a more secure and visually appealing display. However, this method required additional sewing and could be cumbersome for larger quilts.
Corner hangers emerged as a simple, effective solution. They allow me to hang my quilts without any additional sewing or complicated setups. The variety of materials and designs available means I can find the perfect hangers for any quilt, whether it’s a small wall hanging or a large bedspread.
Over the years, I’ve found that corner hangers offer the perfect balance of convenience, security, and aesthetics. They’ve made it so much easier for me to showcase my quilts proudly in my home.
What are Corner Hangers?
When I first started looking for ways to display my quilts, I discovered corner hangers, which have become my go-to solution.
Corner hangers are small, specially designed devices that attach to the corners of a quilt, allowing it to be hung securely on the wall. They hold the quilt in place without causing damage to the fabric, making them ideal for showcasing my cherished creations.


Advantages of Using Corner Hangers For Mini Quilts
When it comes to displaying my quilts, I’ve found that corner hangers offer several benefits compared to other methods. Here’s why I prefer them:
Benefits of Using This Method Compared to Other Methods
- Ease of Installation: Corner hangers are straightforward to install, even for someone like me who isn’t a DIY expert.
- Secure Display: They provide a secure hold, ensuring that my quilts stay in place and don’t slip or sag over time.
- Minimal Damage: Unlike other methods that might involve nails or adhesive, corner hangers cause minimal damage to both the quilt and the wall.
- Aesthetic Appeal: They keep the focus on the quilt itself without any visible hardware, giving my display a clean and professional look.
Materials Needed:
- 2 Squares – equal in size
- Iron
Corner Hangers for Quilts~
1- fold the square in half diagonally
2- iron
3- place in the corners at the TOP, BACK of the quilt
4- sew along two edges – use a scant quarter inch so the stitching doesn’t show
5- stitch your binding on as usual. This will cover the stitching of the corner pockets / hangers
How to hang a quilt with corner pockets video~

FAQ’S
As much as I love using corner hangers, I’ve encountered a few challenges along the way. Here are some common issues and my go-to solutions:
Quilt Isn’t Hanging Level
I start by double-checking my measurements and the placement of the hangers. If the quilt is still uneven, I make slight adjustments to the hangers until it’s perfectly level. Using a level tool can be really helpful during this process.
Quilt Slips Out of the Hangers
To prevent this, I ensure that the hangers are tightly secured to the wall and the quilt. If the problem persists, I add a small piece of non-slip material inside the hanger to grip the quilt better.
Hangers Leave Marks on the Quilt
To avoid this, I use padded or fabric-covered hangers that are gentler on the quilt fabric. If I notice marks starting to form, I’ll switch to a different type of hanger or add padding to the existing ones.
Difficulty Installing Hangers on Uneven Walls
In these cases, I use wall anchors or toggle bolts to ensure the hangers are firmly attached. This provides extra stability and peace of mind that the quilt will stay in place.
Here’s another fun way for hanging a mini quilt~

Additional Media
How to Hang a Quilt on the Wall
How to hang a quilt on the wall without a sleeve
Have a trick for hanging mini quilts?