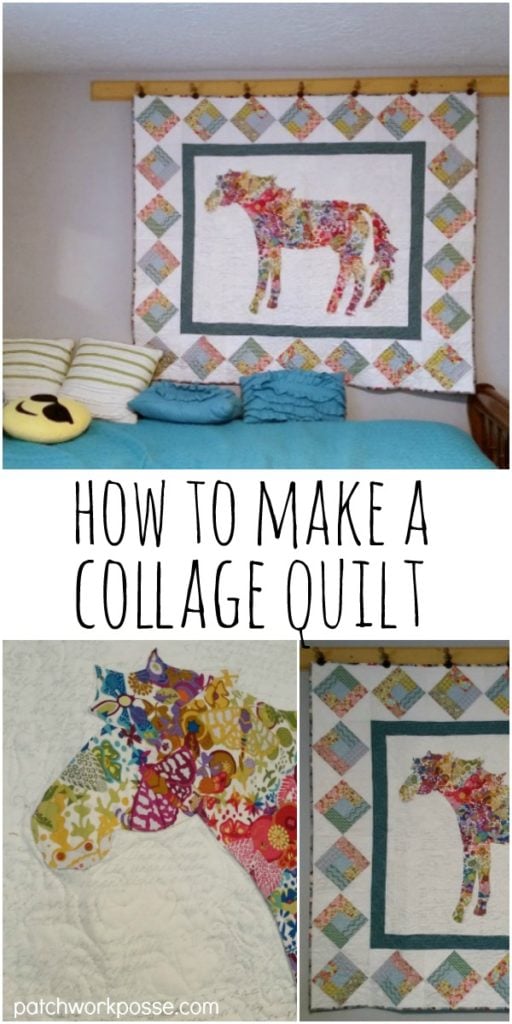
A fabric collage quilt doesn’t need to be scary!
Learn how to make a fabric collage quilt- it’s fun, uses scraps fabrics and unlimited designs and shapes. No rules here! This will help you get started…

This last year I had picked up the horse pattern from my local quilt shop and decided to give a collage quilt a try.
It really didn’t seem to difficult and I had looked at quite a few and the overall process and thought – why not.
If you are looking for a totally different quilting process and technique this might be something to look at. It’s very different and kind of freeing! No rules really, just the shape that keeps you on track.
What is a Collage Quilt?
It’s all about playing with fabric— the fabric, when layered and placed correctly will make the overall design. There isn’t any patchwork or sewing done until the very end when you are securing the layers and quilting.
The fabric can be of any size, pattern, color. When placed together in layers with other fabrics, they come together to make the whole image. A lot of times you don’t see the idea until you step back from the quilt.
They are really a bunch of fun and use quite a bit of your scraps. It does take some time— and a design wall or floor so things can be moved about easily.
Colors and designs on the fabric are used to create the shadows or highlights in the image.
Supplies needed for a Fabric Collage~
Heat-n-bond lite web or glue stick or fabric fuse
Iron
Additional Supplies you may need:
- Rotary cutter or a new sharp blade
- Cutting Mat
- Quilt Ruler
- Sewing Machine this brother is my favorite!
- Iron here or here
- Thread
- Bobbins
- Scissors
- Seam Ripper not my favorite thing to do!

Here’s a quick how to process for making the quilt~
1- decide on your subject or pattern. I went with the horse and it had a large diagram laying out the OUTSIDE lines. The pieces inside the horse are made by the fabric. No other lines are needed. You can decide how large or small the fabric pieces that you use are. Nothing is set and this is where you get to explore and have some fun.

2- cut fabric, place fabric, audition more pieces….repeat, repeat, repeat. It’s play time. Get those little bits out and start layering until you are happy. If you find that you are getting stuck, step back, take a break and come back. Sometimes we are too close to see the issue and stepping back helps to find a new configuration and how things should go.
3- fuse or glue in place. This is kind of the last step. You don’t want to sit and pick at fused fabric……not fun. Don’t fuse until you are super happy with everything and the placement. Make any last adjustments before fusing or gluing in place.

4- trim the shape. This step is for those who are building the collage pieces on a template or backing fabric. This extra layer does add a little bit more thickness but it’s kind of nice to be able to trim where needed for perfect shapes.

5- fuse or glue the large piece to the background fabric of the quilt.
6- finish the rest of the quilt – I had a jelly roll that went along with the fabrics inside the horse….so I made a few simple quilt blocks, placed them on point and added those to the border around the horse.
*the inner border was changed 3 times!!!! Does this ever happen to you? I had picked one fabric, sewn it on and hated it. A big ‘no’. The next border was perfect, but it was purple. Apparently purple is an issue with Eliza 🙂 So another big ‘no’. I believe I may have tried another fabric after that, but found this piece at the quilt shop when I was sewing (it was a late night sewing date) and this worked perfect.
The outside area needs to really compliment the inside collage and not fight it or take over. You’ll find a lot of fabric collages that don’t have many borders if any. They can sometimes cause problems– as you see it did here!!

7- layer your quilt and machine quilt everything securely

How to Make a Pattern for a Fabric Collage Quilt~
There are quite a few different resources out there to help you with your collage quilt.
Did you know that you can even design your own off of a picture? yes!
How to create a fabric collage quilt from a photo tutorial
This is another similar tutorial that shows you how to collage people or animals
Video tutorial on the designing and layering process.
This tutorial is about using the raw edge applique technique with the collage.
How to Get the Fabric to Stay in Place~
There are a few different methods—
1- use an under piece of fabric that has the fusing on it. Layer your fabric and then fuse in place. -this will work with the bottom layer, anything placed on top will need to be fused or glued in place
2- use fusible on each piece of fabric. Fuse to the fabric, then cut the pieces and layer.
3- use a glue stick or some kind of liquid fabric glue to keep each piece secured. This is my favorite method because you aren’t building up a think layer of fused fabric which is hard for the needle to go through for quilting and makes the quilt super stiff. You do need to be aware that the whole piece of fabric will not be secured and you’ll need to do a bit more machine quilting to keep it all down.
4- netting fabric can be placed on top of the whole quilt and then you machine quilt on top of that. This netting keeps everything in place and can give a really cool look to your quilt. It’s not for all quilts, but makes sense with some and could be something that you explore.
How to Raw Edge Applique Video Tutorial–– how to catch your edges to secure your pieces
How do you Quilt a Collage Quilt~
After everything is fused or glued in place, the next step is to machine quilt it. Be very aware when you are fusing your fabrics down that your fusible is not layered so many times that the needle won’t be able to go through the layers.
Here’s a video tutorial on the quilting process.
One thing to note— these pieces are only FUSED down. The edges will pull up eventually when the quilt gets washed and used. If the pieces are small you will need to somehow find a way to catch an edge on them so they don’t fall off.
A Few Beautiful Fabric Collage Quilts~
While in Houston at Quilt Market they had a special display by Danny Amazones. Seeing these quilts in person was a treat.
His quilts are incredible. His process is super fun to watch. These quilts are not small….they are big. He irons on the wall 🙂

Have you ever made one of these style of quilts before? Have any tips for us?


Becky Jorgensen is the creative quilter behind Patchwork Posse, the Patchwork Planner and her online quilt group Patchworkers Plus. You can find her patterns in books, magazines, and her quilt membership. Gather your quilting supplies, organize your sewing space, explore the process of disappearing quilt blocks, or finish a free quilt pattern. I'll help you use what you have, finish what you start and make your quilting journey fun!
Follow me here: Facebook, Pinterest, YouTube


This is a project I’ve wanted to take on for quite a while…but didn’t know how to do it! Perfect timing to find this post! Thank you!
you are welcome and have fun!
What do u do with the raw edges? Does each one need to be stitched down? Just beautiful and would really like to try this.
It is left raw- when you quilt, you’ll want to run over the edges. Or when you are constructing it, you could do a raw edge applique which would catch the edges. hope that helps.
Quilt pattern is “Confetti by Laura Heine of Fiberworks”!
I’ve wanted to make one of these! You broke it down and made it so easy to understand the process. Thank you! Love the horse!
I was lucky enough to go to the Houston festival and see the display of Danny Amazone’s amazing quilts. It was spectacular. He was there one of the days I went and it was great to hear how he assembles his quilts. Thanks for the tutuoral Becky! I am going to have a go!
This is something I’m very interested in making, but I haven’t because I like to make all of my quilts useful as bedding AND machine washable ~ I am uncertain if the raw-edge applique method will “hold up”.
You will just need to make sure that the stitching isn’t too close to the edge or it can pull out. That’s why a couple stitches around the shape is the best option to keep it secure.
I thank you. The article is very helpful. I’ll try to make the giraffe. Up to now I was doubtful I could do it. Again,thank you. Martha Margaride. Love
Great info for just beginning to learn this process. thanks.
Do I use batting for the collage quilt?
yes Jane- same process after you are done with the quilt top as other quilts. Layer and quilt. It does have quite a few layers with all the collage fabric, so just be aware of that when quilting.
If i use a gluestick, will the ironing only work to fuse if i also put fusible (wonder under) as well? Im trying to come up with a Halloween craft project but dont want to bring irons. I want to do the ironing at home later
Has anyone washed theirs? How does it hold up? I made a Laura Heine Nola using steam a seam blanket size. It’s pretty stiff before quilting. I’m hoping that washing it will soften it up. Would love to hear if anyone has had experience with this?
My son found a picture of a dragon head and assured me that I could make it into a full-size quilt for his bed. So together I made my first fabric collage (165 individual fabric pieces…some as small as a pencil eraser). I drew my design on Pattern Ease, drew each piece on Steam-a-Seam 2 Lite, and proceeded to assemble the fabric puzzle. But now I need to get it off the Pattern Ease and onto the black background fabric. My question is – do I need to stitch around each piece before I trim away the Pattern Ease or just around the edge ?? I tried to attach a picture so you can see what I talking about, but it won’t let me. Thanks in advance for any suggestions