
Learn how to sew a zipper bag using leftover quilt blocks or orphan blocks from past projects.
This quick and practical sewing project is a great way to turn unfinished pieces into something useful—while giving your UFOs (unfinished objects) a new life.

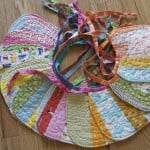
This tutorial walks you through how to transform a single quilt block into a fully lined zipper pouch. It’s perfect for storing sewing notions, pencils, travel supplies, or even gifting to friends. You can make one in under an hour, and no two bags ever turn out the same!

Why You’ll Love This Project
- Quick finish – perfect for a weekend or even an afternoon sew.
- Uses what you already have – great stash-buster and UFO project.
- Practical and giftable – everyone can use another zipper pouch.
- Customizable – mix and match quilt blocks, fabrics, and zipper colors.
- Beginner-friendly – simple straight-line sewing with professional-looking results.

Fabric & Design Ideas
- Use a favorite quilt block that didn’t make it into a quilt.
- Combine scraps and leftovers for a fun, patchwork look.
- Try themed fabrics—holiday prints, florals, or solids for a modern twist.
- Add quilting or decorative stitching before assembling for extra texture.
- Choose a contrasting lining fabric to make it pop when opened.

These little zipper pouches are seriously the easiest things to sew up. If you want- you can make a bunch of them and keep them on hand for later for little gifts. Give them empty or fill them up with some fabulous notions. In one of the quilt groups…they gave each person in the group one of them if you paid your dues on time! Talk about a perfect motivator! lol
For the tutorial today I used 2 UFO Quilt Block that I had dug out from the drawer. Each of them were 9″ X 9″…..but because this is all about you and your UFO Quilt Block, please make the right adjustments.
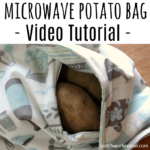
One of the UFO quilt blocks will be shown on the back of the mesh zipper bag, the other will be shown behind the mesh– and all your goodies that you pack inside.

Materials needed:
2 UFO Quilt Block> equal in size
Animal screening cut to width of block you are using X length of block minus 2″
1 zipper the length of the blocks- or a little longer. You will tuck the ends in or you can cut to shorten it if needed
2 strips- 2 1/2″ X width of fabric
Batting, felt or fusible fleece- same size as your quilt block

Learn How to Sew a Zipper Bag Using Quilt Blocks
1) Fold the 2 strips in half the long way and iron
2) Sew one strip to one side of the zipper, the folded edge will be sewn to the zipper
3) Repeat with second strip on other side of zipper
4) Lay the raw edge of the strip you sewed to the zipper on top of the screening material- Sew along this edge
Preparing UFO Quilt Block
1) Lay right sides up the quilt block with the batting, felt or fusible fleece
2) Quilt by machine the UFO Quilt Block to the padding
3) Lay second quilt block on top of the padding
4) Lay right sides together- the quilted UFO quilt block and the zipper with screen
5) Open zipper a little bit {to turn later} and sew all the way around the whole block– you can zig zag the raw edge if you’d like.
6) Trim corners and turn right sides out- the quilted block will be on the outside of the bag
This tutorial is similar to the Clear Bag Tutorial, with a few adjustments.

Ways to Customize Your Zipper Bag
- Add a fabric tab or ribbon loop to one end for easy carrying.
- Use a metal zipper for a polished finish or a nylon zipper for easy sewing.
- Adjust the size of the bag depending on your block—larger for project pouches, smaller for coin purses.
- Personalize with embroidery, appliqué, or labels.
- Add interfacing or batting for a sturdier feel.
Tips for Sewing Success
- Always press your zipper tape before stitching—it helps it lie flat.
- Baste the zipper first if you’re new to installing them.
- Trim your quilt block edges evenly before sewing to keep your bag square.
- Use clips instead of pins to avoid snagging near the zipper teeth.
- Keep a few extra zippers on hand—you’ll want to make more than one!
FAQs About Sewing Zipper Bags with Quilt Blocks
What size quilt block works best for this project?
Blocks between 8″ and 12″ square are ideal, but you can adjust the size of the lining and zipper to match whatever block you have.
Can I quilt the block before sewing the bag?
Absolutely! Quilting adds texture and stability. You can quilt the block onto a layer of batting before assembly for a soft, padded feel.
Do I need to line the bag?
It’s optional—but lining helps hide seams and gives your pouch a professional finish. A simple cotton lining works perfectly.
Can I use different fabrics for the front and back?
Yes! You can use a pieced block for one side and a single piece of coordinating fabric for the other. It’s a great way to feature a special block and use your stash.
What kind of zipper should I use?
A nylon zipper is easiest to sew, especially for beginners. You can also use a metal zipper for a more polished look—just sew carefully near the teeth.
How do I make the bag sturdier?
Add interfacing or fusible fleece to both the outer fabric and lining. It gives the bag more body and helps it hold its shape.
This zipper bag tutorial is a perfect way to put those leftover quilt blocks to good use. It’s quick, satisfying, and endlessly customizable. Whether you’re using orphan blocks, scraps, or your latest fabric favorites, these little pouches come together beautifully and make wonderful gifts.
Once you make one, you’ll be hooked—they’re the kind of project that’s both practical and fun. So go ahead, pull out those UFOs and let them shine as zipper bags instead of hiding in a pile.
More Project Bag Tutorials

Clear zipper bag with June Tailor

Simple cinch bag for your sewing machine pedal

Chicken feed bag for your fabric scraps

Thread Catchers – perfect for using scraps and catching your thread


Love love love this tutorial. YOu have come up with the best little “challenge” I have seen this year. I have so many Orphan blocks I probably can make 10 of everything you do and still have tons left over. I will be back cause I am doing them all!
yay gail!! I am so glad you will be joining me- please share what you make in the photo gallery, i’d love to see them! I am all for get it out of the not moving along project to something doable and finished!
Hi Becky
I like how it goes together, but if I sew all the way around (all 4 sides) as per instructions, how do I turn it inside out? Don’t I need to leave one side open, turn it out, then sew last side?
the zipper is left open big enough to turn everything. Does that make sense now? Hope you make a few!
Hi
What type of store sells the animal mesh?
I am new at sewing so this will be a silly question. What are UFO square blocks. Haven’t quilted yet. Just doing simple things to start out. Yesterday put in a zipper. Not the greatest but got over the nervousness of doing one. Also where DO you get animal mesh?
Donna Messner 🙂
they are leftover quilt blocks from other projects. Ones that don’t have a place to go. They didn’t fit into the quilt, or were left over. nothing silly about asking!
I really loved this tutorial.
I’ve got to say it was difficult to read with the background pattern.
Sorry, just thought I’d mention it as it really hurt my eyes.
What a great idea! I have been anxious to come up with a project for that vinyl screening that wasn’t a purse. This is it!