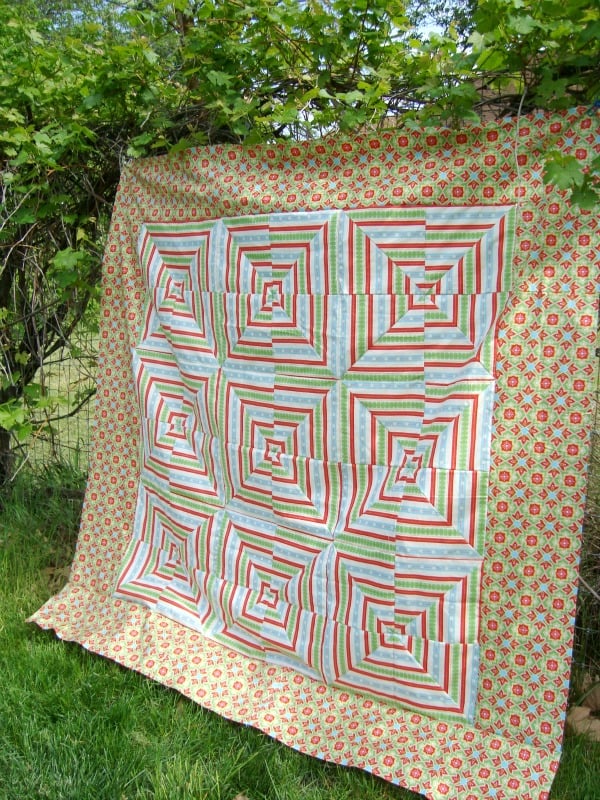
Last month at one of my quilt groups we had a guest speaker who represents Festival of Trees. She was there to talk about the quilts that are auctioned off to raise money for Primary Children’s Hospital. Besides those fancy quilts, she also spoke of quilts that are priced and for sale in their shop at the show. Last year I had a few girls help me tie some small doll quilts which were sold {tutorial found here}.

This year she brought along with her bolts of fabric from Riley Blake! whoop whoop! The company has donated bolts of fabric for us quilters to cut up and make something that can be sold at Festival of Trees. The fabric is beautiful and was so fun to sew with.
So, What to do when surrounded by bolts of free fabric? Rack your brain for designs, patterns, quilt squares…. and then Pick the most obnoxious and hard to deal with fabric……not really, but I went with stripes!
I have always been a big fan of using striped fabric for quilt squares, but sometimes the pattern can get in the way of the design. How hard is it to use striped fabric as a background fabric? As a piece in your flying geese quilt square? You know what I mean? They aren’t easy to sew with.
Another thing to keep in mind is the stripe itself….. are they all similar in size? Some fat, thin? What color is the background? With all of these problems, it’s no wonder they aren’t on the top of our ‘must purchase’ list.
The beauty of these quilt squares is that it is simple and quick. You can whip up a whole quilt in a weekend. You can decide what size to cut your origional blocks, for this quilt square tutorial I used 9 1/2″ X 9 1/2″ squares. Going this large gives you a 18″ quilt square and so the piecing is over after 12 blocks. Love it when they are quick like that.
This striped fabric was perfect for the quilt squares. The lines sometimes met up, but the pattern was different enough that it didn’t look like a mistake. And, your eyes don’t go bonkers because the stripes have a variety of width and color. You can audition the strip to see what it will do by lining up the stripes {right sides together} and then pulling back the top piece at an angle. It will show the effect of stitching down from corner to corner.

* Cut your squares 9 1/2″ X 9 1/2″ — you will need 2 of these per block you are sewing
* Lay two pieces right sides together, lining up the stripes
1) Line a ruler up from corner to corner, Draw a line with a pencil on the wrong side of the fabric
2) Sew 1/4″ from the drawn line on one side
3) Sew 1/4″ from the drawn line on the other side
4) Line your ruler up corner to corner and cut on the drawn line. Open and iron
5) Pivot the blocks and sew two together- repeat with other 9 1/2″ quilt squares
6) Sew the sets together
7) Continue the process until you have enough quilt squares and the quilt is the size you want.
8) Add borders, quilt and bind it

The border fabric came from the same line of fabric, so they are a perfect fit. I have enough leftover of the striped fabric to use as the binding too-
Do you have any striped fabric that is ready to be sewn into a quilt square?

Becky Jorgensen is the creative quilter behind Patchwork Posse, the Patchwork Planner and her online quilt group Patchworkers Plus. You can find her patterns in books, magazines, and her quilt membership. Gather your quilting supplies, organize your sewing space, explore the process of disappearing quilt blocks, or finish a free quilt pattern. I'll help you use what you have, finish what you start and make your quilting journey fun!
Follow me here: Facebook, Pinterest, YouTube


I did one very similar last winter – http://www.flickr.com/photos/quiltiverse/8256875840/ – except I played with the layout after making the initial squares. I cut my fabric into 6 inch squares instead of 9 1/2. End result was a crib-size quilt.
I have more stripes waiting, just trying to finish a few dozen UFOs before I get sidetracked again.
I love it! What a great idea to play with the layout. Totally different design.