

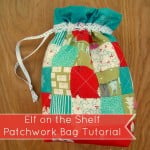
Sew an iron bag using your UFO Quilt Blocks! This iron cover is perfect for a mini iron and is a great way to haul around to sewing retreats.
Mother’s Day is upon us and we need a few things for ourselves don’t we? Well, how about buying yourself a mini iron to take to retreats and classes? After getting yourself one…you need of course a cute little bag that can carry that hot stuff around don’t you? Oh, Yea!
And while you are piling the list of wants how about adding a little retreat! That’s right, go plan one and ask those crafty friends of yours to come along…the more the merrier.
Let’s talk about your retreat……So you go on a retreat and start packing up all your stuff. We have a lot of things to bring don’t we girls? You betcha!
Now, the purpose of a retreat is…to get some sewing done without distractions. Right? Who wants to be distracted by getting up and down from your chair to get in line at the pressing station? Not me! So, I bring along this nice compact mini iron. But, guess what it is now time to go and we have sewn until the girl in charge is literally kicking us out {woops there goes all the power} so we must quickly stuff everything back into where it belongs and be on our way.
What about that HOT mini iron? Will it catch my just finished quilt top on fire? Will it melt to the sewing machine cable? Will it burn the floor mat in the car? {not that I’m speaking from experience}. So we MUST have a little bag to stuff that mini iron in as we are running out the door.

– Key Takeaways –
- Perfect for Mini Irons: This DIY bag is just the right size to store and carry your mini iron, making it a must-have for quilting on the go.
- Customizable Design: Easily adjust the size and add fun details like pockets or quilted layers for a personal touch.
- Protective & Practical: Use heat-resistant fabric to make the bag safer for storing a hot iron while protecting other items in your bag.
- Easy-to-Wash: Choose machine-washable fabrics for a low-maintenance, clean storage solution that’s ready to travel with you!

~ Mini Iron Bag Tutorial ~
Materials needed:
- 1 mini iron
- 2 – 8 ” X 8″ squares outside
- 2 – 8 ” X 8″ squares lining
- 2 – 8 ” X 8″ insulbright batting {used for hot pads and such}
- 2 – 8 ” X 8″ batting
- 1 – 2 1/2″ X 16″ strip
- 2 – 4 1/2″ X 6″ pocket and pocket lining
Mini Iron Cover Bag Instructions:
1) Cut out all the pieces– notice that the fabric blocks I used were from this project. This is a perfect patchwork craft project to use up those lost blocks- or piece some together to make it a scrap eater.
2) Take the strip and fold one end in. Fold again and sew down the edge. Repeat for the other side.
Iron the strip in half the LONG way. {this will end up holding the ribbon}

3) Sew the pocket pieces, Right sides together. Leave an opening for turning right sides out.
4) Turn rights sides out, iron flat and pin onto the front piece of the back. {keep that turning hole at the bottom or sides}. Sew to the bag front along 3 edges.

5) Layer the batting, insulbright, and the outside bag fabrics as follows. Pin together {line then up first} and then sew on 3 sides- leaving the top open. Trim the corners and Turn Right sides out.

6) Place the inside liner fabric right sides together and sew along 3 sides—LEAVE an opening along the bottom for turning!!!—{the picture shows this on the left side, but it is really the bottom}. Leave the TOP open also.

7) Pin the folded strip to the top of the outside piece. Place the folded ends at one side seam. Pin the ends down so they don’t get folded back when sewing.

8) Slip all of this inside the lining {notice it is not turned out so the right side out the outside bag is facing the right side of the lining} and pin in place.

9) Sew across the whole top.
10) Pull the inside to the outside through the turning hole at the bottom.

10) Sew across the opening on the bottom of the bag. Stuff it all inside. Pull a ribbon through the top and tie in a knot at the end.

11) Stuff that cute mini iron in the bag —and off you go!


Isn’t that a quick, easy and perfect pattern for beginners? You can whip up a few iron case for a group, gifts, or just for yourself.
WANT TO REMEMBER THIS? SAVE THE TRAVEL MINI IRON BAG TUTORIAL TO YOUR FAVORITE DIY PINTEREST BOARD!

+ Here are more ironing helps +
Homemade Spray Starch cheaper than store bought!
Mini Iron Travel Bag Tutorial just in case you travel with your mini!
Make your own portable iron station
Iron or Press? Which one is right for your project?
More Ironing board stations inspiration
FAQ’S
Can I make this bag with heat-resistant fabric?
Yes! Using heat-resistant or insulated fabric for the lining can help protect your bag from the iron’s residual heat.
What size irons fit in this bag?
This bag is ideal for mini travel irons, but you can adjust the dimensions to fit slightly larger ones if needed.
Is it washable?
Absolutely! Choose washable fabrics for easy cleaning, especially if you use your iron on various projects and materials.


So clever! Adding this to my list of things to make!
Love the ease with which the little bag works out.
It would also work well to hold camera lens for my photographer daughter.
Many thanks
Amanda
I think it is very cute. But – if the iron is hot when it is put into the bag, wouldn't it scorch the lining fabric?
really you shouldn't unplug and pack anything that is hot. these little irons don't get to the hight temp like a big one….but just in case. always let it cool down for a bit before packing it away.
yea, totally. skip the hot batting and use just regular and there you go! cinch it and then use the ribbon as a wrist handle too. perfect. great suggestion. thanks!
share a photo when finished! i'd love to see it.
Great tutorial & cute bag! I’m looking into buying a small iron for retreat purposes too! I have a question about your iron… If the plug is on the back, how do you set it down between pressing seams or do you have to unplug it every time? Thanks!
Maybe it just looks like it from the photo. I will go take a peek at the link :o)
I love this and I see it is big enough to put a coffee cup in the bag as well, yippee.