Hi! Sara from Made by Sara again with a clothing sewing tip!
Last Tuesday I shared here at Patchwork Posse a tutorial on how to make the most quick & easy girls skirt – you can find it here just in case you missed it. Today I am sharing a tip on how to make the skirt’s side seams with a complete clean finish.

There are several ways of making pretty seams (where no stitching (zig zag or serging) is visible) but today we will be looking at French seams. This kind of seam encloses the not pretty raw edges.
Besides being prettier, these seams are also stronger since you stitch two rows of stitching. Perfect for all those kids clothes that get worn over and over!
How to make French Seams – a tutorial

1- Start by sewing the two skirt pieces with wrong sides together, at a 1/8” seam allowance.*
You will be stitching on the right side of the fabric. No worries though, since this seam will be enclosed on the next step!
* In this case, because we have add only a 3/8” seam allowance on each side of the skirt pieces we will have to stitch at only 1/8”. The alternative is to add a 1 inch seam allowance when cutting the skirt pieces or any other pattern you’ll be using.
If your fabric frays a lot – like the one I used here – you need to trim all those threads otherwise they will show up at the end, and believe me it won’t look good. (Don’t ask me how I know it, okay?)
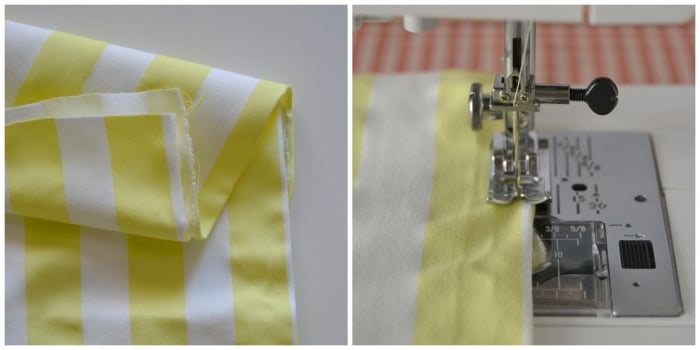
This is how it will look on the right side. The stitching is visible.

Give it a good press to set the seam. Then press the seam open – which in this case will be not an easy task.
Now, let’s hide that seam!

2- Turn wrong side out. Press. Stitch along the fold at 1/4”.
The raw seam on the right side is now (or should be) hidden within those two lines of stitching. It should look as in the image on the right (above).
You’re done!

Here is an up close image of how it looks on the outside (top) and on the inside (bottom).
It is super easy, right? And doesn’t it look so neat? I love this method! This kind of seam can be used in several other projects either than clothing. So, get creative and make it with these beautiful seams!
Happy sewing!

Becky Jorgensen is the creative quilter behind Patchwork Posse, the Patchwork Planner and her online quilt group Patchworkers Plus. You can find her patterns in books, magazines, and her quilt membership. Gather your quilting supplies, organize your sewing space, explore the process of disappearing quilt blocks, or finish a free quilt pattern. I'll help you use what you have, finish what you start and make your quilting journey fun!
Follow me here: Facebook, Pinterest, YouTube


Thank you for sharing this tutorial! I have done several pillow case patterns with a French Seam but only after accidentally clicking on a wrong video. It turned into my favorite technique for finishing seams. I hope that a lot of newbies and anyone who has not done a French Seam reads your tutorial. Thank you for sharing and have a wonderful creative day!
Brenda- thank you! Too funny, I totally watch the wrong ones too and get so confused but when it’s finished I love it!
Your article contains all the necessary elements which makes the article interesting.