Making your own shower curtain with a quilt is pretty simple! Learn how to make a quilted shower curtain with a quilt top. No batting is required and it’s easy to clean.
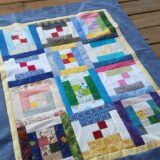
In the kids bathroom, the shower curtain is a quilt that I made many years ago. It was actually a quilt block swap type of deal. I made 12 of the same block and then we each swapped the blocks, getting all 12 from others. So much fun!
This crazy dog quilt was perfect for a fun addition- and the bathroom is where it went.
Materials needed:
- quilt top
- backing fabric
Basic Quilting Supplies-
- Rotary cutter or a new sharp blade
- Cutting Mat
- Quilt Ruler
- Sewing Machine this brother is my favorite!
- Iron here or here
- Thread
- Bobbins
- Scissors
- Seam Ripper not my favorite thing to do!
Because you are hanging it, and because it’s just a simple curtain– there is NO BATTING needed. In fact, that would cause a little bit of issues, so really- don’t even think about adding it.
The simple front and back is perfect for washing anytime you need as well as light enough to hang on curtain hooks.

There is a little bit of work to get it to the right size….but other than that, it sews up pretty quickly.
Just as with any other shower curtain, you’ll want to use a plastic curtain on the inside. That will repel or absorb most of the moisture.
Quilted Shower Curtain instructions:
1- Measure the opening for your shower area. Typically they are around 70″-72″ and 70″-72″ tall. If you need it longer or larger, make your measurement adjustments now.
2- Measure your quilt top that you will be using for the shower curtain.
3- Add borders to the top, sides and bottom IF YOU NEED TO. After I had the blocks together, it wasn’t quite the right size. I added a larger fabric strip along the bottom of the quilt and another strip along the sides. This worked great, but you can add more blocks if you have them as well instead of fabric strips.
4- Measure your quilt top and cut a backing fabric the same size.
*NO batting is needed!
5- Lay right sides together – the top and the backing fabric. Pin to secure the edges
6- Stitch all the way around all four sides of the quilted curtain, leaving a 5″ opening for turning
7- Snip the corners and turn right sides out
8- Press the edges and fold a 1/4″ where the turning opening is
9- Stitch 1/4″ – 1/2″ from the edge to secure the edges

10- Hand stitch the opening closed if needed

Along the top edge, you will need to use some larger grommets or sew some button holes.
Either works in allowing the shower curtain hooks to hold the quilted shower curtain up.
Hanging your Quilted Curtain
1- Measure the top
2- Using the number of shower curtain rings, divide the measurement by that number.
3- Using a pencil, mark the locations of the hooks on the top. Make any adjustments now before proceeding.
4- Sew with your machine button holes or use a grommet system for installing the grommets.
5- Hang the lining first, then the quilted curtain second. There are newer curtain rings that allow for a lining and a curtain separate. Those work great as well.

Have you ever used a whole quilt top for a shower curtain? What tips do you have for use? Share it in the comments below.