Learn how to make a Herringbone Table Runner using the quilt as you go technique. Simple and great for your fabric strips.
Table runners are perfect for giving your room a new look without spending a whole lot of money and time on it. They are kind of like pillows. They can add pops of color and design to the room pretty quick.

For this table runner, I thought I’d take try at making a herringbone or braided design.
No template is needed…and if you put your backing on before you start you will have a quilt as you go project! (I of course forgot until I was done that I didn’t do that!)
If you forget your backing like I did, you can add it later, do a few straight quilting in the ditch of the seams and then continue to the binding. No biggie, but it does add a bit more stitching time.

Materials Needed:
FABRIC: pick it up at Connecting threads or Fat Quarter Shop
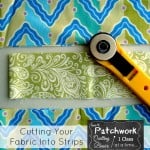
fabric strips- 2 1/2″ X WOF
center square- 4 1/2″ X 4 1/2″
backing & batting- 20″ X 40″
Depending on your own table, you can make adjustments to the finished size of the batting and backing fabric.
Supplies you may need:
- Rotary cutter or a new sharp blade
- Cutting Mat
- Quilt Ruler
- Sewing Machine this brother is my favorite!
- Iron here or here
- Thread
- Bobbins
- Scissors
- Seam Ripper not my favorite thing to do!

Herringbone Table Runner video
How to make a Herringbone Table Runner Tutorial~
1) Center your square on the batting piece- pin if needed
2) Cut the first strip 4 1/2″ long and pin (if needed) along one edge of the square- stitch in place
3) Turn the piece and then measure and cut the next strip, stitch in place

4) Repeat this process until you can no longer go around because you hit the edge of the table runner

5) Now you will repeat the same process but only working on one side– continue this until you only have one corner to work on

6) Repeat the same process only working on one corner at a time
7) Repeat with the opposite corner and then the other side of the table runner
8) Iron the table runner

9) Turn over and using your batting and backing as a guide, trim the extra strips


10) Bind the table runner

WANT TO REMEMBER THIS? SAVE THE HOW TO MAKE A QUILT BLOCK ON POINT TO YOUR FAVORITE DIY PINTEREST BOARD!

Here’s some other fun BRAIDED table runner tutorials:
Herringbone Table runner – more than one strip!
Herringbone Table Runner using wide strips
Have you made the herringbone or braided quilt technique? Share your hints and tips with us in the comments