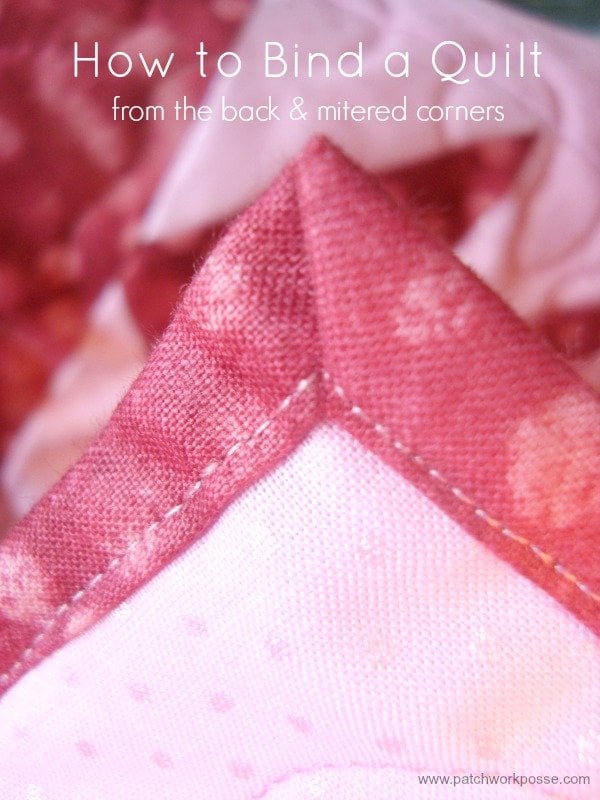
We are continuing the series in the how to bind a quilt!! Today we have the one that I use all the time….the classic rollover.
I know, you might think that this is a cop-out, but really it is truly a bind and looks like a bind. On the front.
If anyone is stuck on bindings out there- this is for you! This is really a pretty quick way of doing it and great for beginners.

How To Bind A Quilt Tutorial
1) Before quilting you need to make sure that your back is LARGER than your front!! This is the only way that this type of binding will work. You should always have extra on the sides when quilting anyways, but just in case check.

2) After quilting you need to trim those edges. The TOP of the quilt and the batting needs to be trimmed to the edge of the top of the quilt. Scissors are the best here. You need to especially make sure that the back doesn’t sneak into that scissor line and get snipped. { i really hate it when that happens} You want to be cutting ONLY the TOP and the BATTING here. NOT THE BACK!!!
3) Trim the back. Now you can use a super long ruler with your rotary cutter and trim the back. Take your ruler and measure 3/4 inch past the top. BE consistant on this girls! It helps the front look nice I tell you. Go around all 4 sides and trim, trim, trim. 3/4 inch. yup. that’s it.

4) Now is the making the binding part. Take that 3/4 inch extra back and fold it. Line the raw edge right up to the edge of the top and batting edge.

5) Fold once more. It will fold onto the top of the quilt and be 1/4 inch past the edge.

6) Pin, hold, clip in place. Now, here girls is where I cheat. I have been doing the binding for too many years to mention { don’t judge me now} and so I can just whip it over to the machine and get that thing done in no time. No pinning or clipping for me. I know how to keep it in place and make it behave. If you noticed though girls- this is Very similar to rolling the edge over on a blanket and making it a nice egde.
7) Sew that edge down. Take it to the sewing machine and sew right along that edge. You don’t want to be so close you are constantly jumping off and missing it, but not so far in it looks like a rookie was doing it. {rookies become pros though, so don’t give up}

Alternative….you could hand sew that down if you would like. After fold, fold and pin or clip in place sit and stitch it down. Make it all pretty like. Me, I just stitch and be done. but, you know that already. 🙂
Corners: Now corners can be tricky girls. This is the way I do them and I get a nice mittered corner on the top.
1) Stop sewing at least 1 ” before the end of the side you are stitching down. This will give you enough room to fold over the next side and make that corner good looking.
Fold that next side CORNER in a triangle.

Fold the edge till it meets the edge of the top and batting edge. Just like above. Then fold it again so it overlaps the top 1/4 inch.

Then continue sewing along that edge to finish the binding and then —keeping your needle in the down position AND on top of the next side that you just folded nicely— turn the corner to the next side.

Finish sewing and folding and mitering the binding until you have done all 4 sides. Isn’t that quick and wonderful?
Anyone have any questions or suggestions or hints that you would like to share? Does anyone oppose doing it this way? {wanna fight after class?} Leave a comment and let us know it.


Becky Jorgensen is the creative quilter behind Patchwork Posse, the Patchwork Planner and her online quilt group Patchworkers Plus. You can find her patterns in books, magazines, and her quilt membership. Gather your quilting supplies, organize your sewing space, explore the process of disappearing quilt blocks, or finish a free quilt pattern. I'll help you use what you have, finish what you start and make your quilting journey fun!
Follow me here: Facebook, Pinterest, YouTube


That was wonderful!! thank you for the tutorial. I have never used that method, but can think of a number of times it will come in handy.
Two thumbs up, Becky. I think I will try that on a wall-hanging before I brave a quilt.
This looks so easy and quick! Have you ever used a decorative stitch along the edge? I will have to try this technique on my next small quilt.
Happy Quilting!
Cindy
never thought about the decorative stitch….that would be wonderful!
I would start out small, but it won't take long to get the hang of it.
Thank you for sharing especially in such a heartfelt giving way. After reading so many “professional” quilters it was awesome to feel the ease and warmth you share. Having a head injury usually has me reading and rereading many times something I have done many times but your wording makes it all a breeze. Thanks so much for all you give.
i just finished piecing together my first quilt – your tutorials on binding are excellent – can't wait to get the quilting done, feeling confident i can tackle the binding on my own now! thank you!!
camille that is great! first quilts are always fun. hope you find one that works. come share the finished quilt with us too. i'd love to see.
i am posting it in wed. post! thanks for the showing it off. love it.
i am posting it in wed. post! thanks for the showing it off. love it.
I have just got to the binding stage in my first quilt. I have decided to try binding it in this way, but I am stuck on the corners I can’t quite understand how to fold a triangle! much as I have fiddled about I can’t get that mitered edge, help?
My favorite fast way to bind a quilt! I’m just finishing up 2 little baby quilts, and that’s how I’m going to do the binding, using a decorative stitch. Thanks for sharing.
Thank you for a simple explanation to something that seems so difficult! I too have bound quilts this way and it’s so easy and looks professional (to us anyway : )! Are you in to making t-shirt quilts? This is the way to bind them! I’ve made four and am on my way to starting the fifth one. It just happened, I had extra backing fabric that extended past the sewn together t-shirts and was on a deadline to get it done for graduation so just tried it. I plan to bind all the quilts that way from now on! Thanks again! (and I don’t want to fight about it either!)
I am going to use your binding technique for making a microwave bowl pot holder. Wish me luck.
I just love your sense of humor . Great way to finish my next quilt. Thank you very much!