Learn how to turn a layer cake into a playful, modern quilt with the free Wheelies pattern! This design is perfect for showing off those big, bold prints you’ve been saving—whether you’re a beginner or a seasoned quilter looking for a quick project.
The best part?
You’ll make the most of your layer cake squares with simple cutting and piecing techniques, so you can sew a beautiful quilt top in no time.
Grab your favorite fabric bundle and let’s roll into a fun quilting project that’s as sweet and simple as it sounds!
The spokes of the wheels are simple pinwheels. Find and match up 4 that share the same color and you will have a more unified pinwheel.
If you don’t want to be so fussy– mix and match and scrap it up! Because all the squares get used there isn’t enough to finish one more large block so the little 2 leftovers get put right in center square.

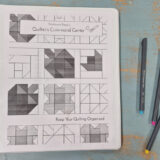
Wheelies Quilt
Finished Quilt Size: 80″ X 64″
Materials Needed:
- 1 Layer Cake OR 42 10″ X 10″ squares {21 light and 21 med/dark}
- 2 yards background fabric
- Block Size” 17 1/2″ X 17 1/2″
- Fabric: Coordinating fabric and optional scraps
- Tools: Rotary cutter, cutting mat, ruler, sewing machine
- Thread: Matching or contrasting
- Extras: Pins, iron, marking tools (optional)

The idea for this quilt came when the boys needed some twin size quilts for their beds, and I had a reunion layer cake sitting around (ok really it sat for a week) and I wanted something totally easy, quick and a no brainer. The blocks came out just right, you use every single bit of the layer cake (no cut-offs at all) and they are enough boyish to work with the background being grey. Love that!
Helpful Layer Cake Tips
- What is a Layer Cake? A layer cake is a bundle of pre-cut 10″ x 10″ fabric squares, usually from a single collection. It’s a great way to sample a whole fabric line without having to buy big cuts.
- How many squares are in a layer cake? Most layer cakes have 42 squares, but double-check as some bundles can vary.
- Mix it up! If you’re short on layer cake squares, you can always cut your own from stash fabric—just grab your rotary cutter, ruler, and cutting mat to make 10″ squares from leftover yardage or scraps.
- When cutting layer cakes: Be gentle! The layers can shift easily, so use a sharp rotary blade, a ruler with good grip, and cut with firm, even pressure.
- Layer cake quilts are beginner-friendly. Since the squares are pre-cut, you spend less time measuring and cutting, and more time sewing and creating. Perfect for a quick quilt top that comes together in a snap!

– Separate the lights and darks. You need 21 lights and 21 med/darks
– Cut list for sashing: 16–-3” X 17 1/2” and 4–4 3/4”X 17 1/2”
– Cut list for center blocks: 5–3”X 64 and 4–9”X 4 3/4″
Wheelies Block Instructions:
1) Place a 10″ X 10″ light square on top of a second med/dark square-right sides together.
2) Draw a line from corner to corner of square. Use a pencil and draw on the wrong side of the fabric
3) Sew 1/4” from the drawn line on BOTH sides.
4) Cut on the drawn line and iron- you will now have 2 1/2 square triangles

5) Place one half triangle on top of another half triangle– right sides together Hint: darks should be opposite darks. Lights opposite of lights.
6) Draw a line from corner to corner of the square– should be perpendicular to the previous sewn seam. Use a pencil and draw on the wrong side of the fabric.
7) Sew 1/4” from the drawn line on BOTH sides.

8) Cut on the drawn line and iron.
9) Match up 4 of your squares with one wheel being the same color.

10) Sew the 4 blocks together-repeat for a total of 10 blocks. They will measure 17 1/2” X 17 1/2”
Center Blocks:
1) Sew 9” X 4 3/4” background to each side of the block
2) Sew 17 1/2” X 4 3/4” background to top and bottom of each block.
3) Repeat for a total of 2 finished blocks

Sewing The Top Together:
4) Using the layout diagram– sew sashings in between the blocks and at the ends
5) Sew the blocks with sashings into rows
6) Sew the sashing strips in between the rows- pin before sewing
7) Sew the rows together Hint: When you are sewing the rows together, match up the sashings from the previous rows. Lay them down right sides together and fold down the top layer just a little to make sure they are lined up correctly. Pin in place and then sew.

Quilt Size: 80″ X 64″
Block Size: 17 1/2″ X 17 1/2″

The wheelies quilting ended up an angular triangle kind of design. lots of straight lines that crossed each other. Nothing swirly or twirly. Very straight and boyish

Buy the PDF Pattern
More Layer Cake Patterns:
Layer cakes are seriously one of the most fun and flexible pre-cuts to work with. Whether you’re sewing up the Wheelies pattern or trying a different design, they give you a head start on cutting and color coordination.
If you’re loving the ease of layer cake quilts, here are a few more free patterns to check out that are perfect for using up your 10″ squares!

Single Slice Pattern
Chevron Quilt Pattern

Quadripoint Quilt Pattern

10+ Free Layer Cake Quilt Patterns
Frequently Asked Questions
What is the finished size of the Wheelies quilt?
The finished quilt measures approximately 80″ x 64″, making it suitable for twin-sized beds or as a generous lap quilt.
2. What materials are needed to make the Wheelies quilt?
You’ll need one layer cake (42 squares of 10″ x 10″ fabric), ideally with 21 light and 21 medium/dark fabrics, and 2 yards of background fabric.
3. Is this pattern suitable for beginners?
Yes! The Wheelies pattern is beginner-friendly, featuring simple cutting and piecing techniques. It’s perfect for showcasing bold prints and using up your fabric stash.
4. How are the pinwheel blocks constructed?
The pinwheel blocks are made using half-square triangles. By layering light and dark squares, sewing, cutting, and rearranging, you create dynamic pinwheel designs.