
One of my favorite parts of camping is sitting around and shooting the breeze with everyone. No distractions, like computers {totally addicted}, cell phones {out of reach}, and gaming {the batteries run out}….. so sitting is what I do. Whether it be sitting in my camp chair in the water or on dry land under a shady treee….that is where you will find me.
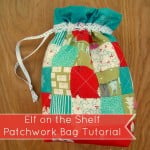
One thing about camp chairs though- they don’t have any storage! I have one chair that has a pocket on the back, but really who has arms long enough to reach behind themselves to grab whatever you are storing {which by the way it totally jabbing you in the back} behind you. The solution to this tricky situation is sewing yourself a camp chair tote bag that hangs on the handle.

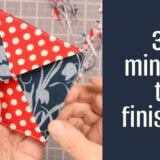
This easy pattern for beginners is not a fancy one. No lining for this bag- and raw edges too! Gasp. Sometimes making a simple bag is all you really need to do to be functional. This is a camp chair handle bag for heaven’s sake! It will be thrown on the ground {if your kids put things away like mine do}, tossed about when the wind storm hits, full of leaky water bottles loaded with drink mixes…and more. So, I went with simple, sweet, to the point and washable- or tossible if something gets out of control oozing.
The quilt block I chose to use was from a swap years ago. It is summery and matches the yellow gingham check I had on the shelves. Plus, I took advantage of the already fuzzy raw edges of the fabric to make it even easier!
Materials Needed:
fabric square the same size as your quilt block
1/2 yard fabric
2 buttons
Bag-
Cut 1 piece: 13″ X 14″
Cut 1 piece: 13″ X 12″
Handles-
Cut 4 pieces: 2″ X 9″
Pocket instructions:
Pin right sides together quilt block and fabric square
Sew all the way around leaving a 2″ opening for turning
Snip corners and trip right sides out
Iron and close hole with ladder stitch
Strap Instructions:
Pin 2 pieces- right sides facing out and sew all the way around. Repeat with other strap
Sew a button hole at one end that will fit the button you will use later. Repeat with other strap
Pin on one side and sew to the back of the tote bag- Sew an X to secure it {do not sew the end with the button hole down} Repeat with other strap.

Sew a button to the front on top in the center of where you sewed the X- photo shows the strap already buttoned, which means the button is sewn on the X marks the spot

Tote Bag Instructions:
Pin the pocket in the middle of the smaller piece. Sew the sides and bottom {leaving the top so you can stuff it full of good things}
Pin right sides facing out -the front with the pocket and back of the tote bag. Line up the bottom edge. Sew the sides and bottom of the bag. Sew a second seam to secure it.


This is part of the 52 UFO Quilt Block Pick Up seriesneed more ideas on what to do with your UFO Quilt Blocks? previous weeks and UFO Quilt Block ideas
If you are sewing along with us and making up something with your UFO Quilt Blocks {even if you find your own way of sewing them together} we would all love a little peeksee!
Post them in the UFO Quilt Block Photo Gallery.
If you’d like a little reminder in your email for the UFO Ideas and posts- Sign up for my weekly updates {includes a couple of free patterns right off the bat + anything new that I add. Lucky you!} Remind me of the 52 UFO Quilt Block Pick Up and other Sew Alongs!


This is so cute and I think I need to make one!
~Heather
This is so cute and functional! Thanks for sharing at Pinworthy Projects.
I need some of these!! My daughter has soccer games every Saturday during fall and spring and we bring those chairs to sit in. I posted on Craft Gossip with a link to your tutorial: http://sewing.craftgossip.com/tutorial-camp-chair-bag/2013/07/16/ –Anne
Anne- I love that it works for you! I just got back from handing out at Utah’s ocean- bear lake…… forgot my bag! Waaaaa. sure would have come in handy. darn it. Thanks for sharing the post!
on a thin fabric it would hold it’s shape better some iron on interfacing.. Or light iron on quilt batting..
thanks for the tutorial..
I chuckled when I saw the picture of your bag.
I have just made a ‘tote’ for my camp chair (ie) to carry my chair in.
Totally different applications 😉
haha! What a surprise! Great idea though to make a new bag…some of mine have seen the end of their day!