During the summer a friend and I had volunteered to be in charge of our quilt group meeting.
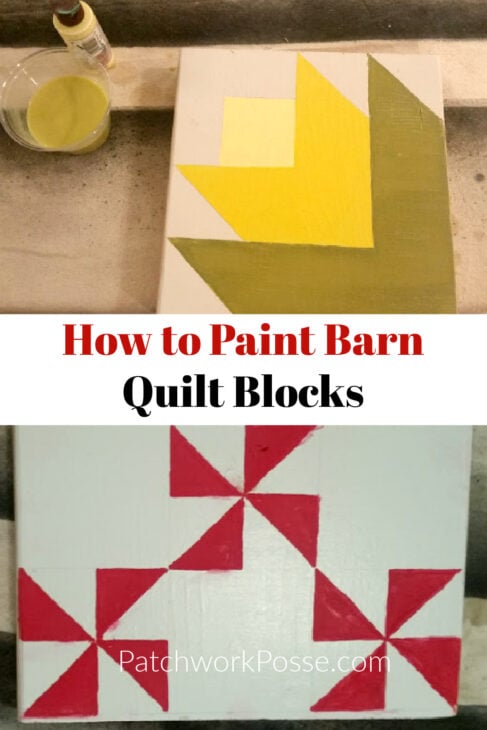
We decided to do— barn quilt block painting.
During the spring we had gotten together and painted large quilt blocks on 3 X 3 squares. They are big and wonderful, but knew that they were too large for the group to make.
After looking around for a bit we decided to go with a chunky piece of wood. 2″ chunky. That would keep the wood from warping for the most part and if they wanted to stand it up they could- on a shelf or table. Or if they wanted, they could use it laying down like a hot plate.
It was so much fun!
Choosing Your Design!
+ Selecting a Design That Complements Your Space
Choose a pattern that matches or contrasts with your decor and fits well in the display area.
+ Popular Barn Quilt Block Patterns and Their Meanings
Patterns like Ohio Star and Bear Paw have traditional meanings. Pick one that resonates with your style or values.
+ Customizing Designs to Fit Your Personal Style
Personalize your design with your favorite colors or unique elements. Mix patterns or create your own to reflect your creativity.
Materials needed for Barn Quilt Blocks:
- 1 block of wood. We went with a 2 x 8
- primer
- brush
- acrylic paint in your choice of colors
- pencil
- ruler
- painters tape
- Quilt block designs

Different Techniques & Ideas
+ Incorporating Advanced Painting Techniques
Experiment with shading and stenciling to add depth and detail to your barn quilt block. These techniques can elevate the overall look and make your design stand out.
+ Adding Texture and Embellishments
Consider adding texture with raised elements, such as wood carvings or fabric appliqué. You can also incorporate mixed media, like metal accents or beads, for a unique, personalized touch.
+ Creating Multi-Panel Barn Quilt Designs
Expand your creativity by designing multi-panel barn quilts. Combine several smaller blocks to create a larger, cohesive piece that adds a dynamic element to your space.

Because I had the wood before the actual meeting, I choose to prime the one side with a roller and let it dry. Then I had the honey help cut them apart and I sanded the edges.
This was a way to speed up the process with a large group– all they had to do was come up with the layout / block design and then paint. No waiting for the primer.
But here are the instructions for painting them individually.
Barn Quilt Block Painting~
1- Cut your block so they measure 8″ x 8″
2- Prime the side that you are painting
3- Sand the edges so they aren’t sharp

4- Draw out your design with a pencil and ruler– we took a couple of minutes to look on the internet and search for quilt blocks. A lot of them had it on their phone the whole time to help with drawing it out and choosing colors. Everyone came up with a different design. Was fun to see what they loved and painted.

5- Tape off the sections if you are worried about straight lines or keeping within areas
6- Paint the different sections – let dry in between coats of paint and sections

7- Outline in black if you want that kind of a look- you could use a sharpie marker or black paint if your hand is steady.

Here’s a quick look at some of the painted blocks.
A few things needed to be finished on them, but there was just enough time in the meeting to get a great start and layout of the designs.
You can decide how detailed you want to go or keep it simple.


+ Additional Resources
- Barn Quilt Meanings
- 13 Free printable barn quilt patterns, Anyone can make!
- The Round Robin 30 – make your own barn quilt
FAQ’S
What materials do I need to paint a barn quilt block?
You’ll need wood, exterior-grade paint, brushes, painter’s tape, and a sealant to protect your design.
How do I prevent paint bleeding?
Use painter’s tape to create clean edges and press it down firmly to prevent paint from seeping underneath.
What should I do if my surface is uneven?
Sand the wood thoroughly before painting and apply a primer to create a smooth base for your design.
Can I customize my design?
Absolutely! Feel free to choose colors and patterns that reflect your personal style or fit your space.
Becky Jorgensen is the creative quilter behind Patchwork Posse, the Patchwork Planner and her online quilt group Patchworkers Plus. You can find her patterns in books, magazines, and her quilt membership. Gather your quilting supplies, organize your sewing space, explore the process of disappearing quilt blocks, or finish a free quilt pattern. I'll help you use what you have, finish what you start and make your quilting journey fun!
Follow me here: Facebook, Pinterest, YouTube


Very cool project, love this, thank you for sharing !!!
you are welcome! They were a bunch of fun to make.