
Hi, I’m Wendy, from Sugarlane Designs. Today is ‘Tip’ day, so as promised in Tuesday’s tutorial, I’ll be showing you how to perfect your satin stitch.
Don’t get me wrong, this won’t make you magically stitch a perfect satin stitch the first time you try it….like everything, it will take practice, but I will give you the hints to begin the process and get that satin stitch magic underway! (You’ll notice mine STILL aren’t perfect, but I think that’s to do with my night time vision, and probably not using a hoop, more than anything!)
There are a few ways to stitch a satin stitch but this is my favourite way. I find this technique gives you a neat outline to your stitch and pushes the satin stitch up proudly which makes it look more professional.
NOTE: It is important, if you want a nice neat satin stitch, that you use an embroidery hoop and use a ‘stabbing’ technique. This is where you ‘stab’ the needle into your fabric and pull the thread through before ‘stabbing’ again, rather than the ‘in and out with one motion’ stitch which is more suitable for other stitches.
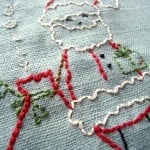
Firstly, you’ll need to backstitch around the outline of the satin stitched section…this is VERY important…..in our case, it was the polka dots on the teacup.

Make sure you outline neatly on the lines, don’t try to shortcut the process by doing larger stitches as, despite being hidden, these stitches will determine the outline of your shape. If you do large stitches, particularly in these dots, your overall shape will become more angular, rather than circular and your satin stitch will just look horrible.
Next, start with one satin stitch along the diameter of your dot, from edge to edge. You will start by coming up just on the outside of your stitched outline, and going down on the outside of your stitched line on the opposite side. Try and place it directly opposite as this will make your stitches straight. Bring your needle up right next to where you came through with your last stitch and repeat with the stitch going down right next to the previous one.

Repeat this, keeping your stitches right close to one another until you’ve worked one half the dot and then use the same process to complete the other side of your dot. 
There are a couple of reasons why you start in the middle. The first one is so that your circle remains a circle! Surprisingly enough, no matter how hard you try to stitch an irregular shape, if you start on one edge and work your way across to the other, the circle tends to ‘warp’, distort and become odd shaped. The second reason is more for when you’re using variegated threads as the variegation tends to be better and more even when done this way.

See? Not so hard is it? So next time you’re faced with a satin stitch, don’t run and hide, give it a go. You’ll be pleased that you did.
Come visit me at Sugarlane Designs and pop back here to find out where else you can find me.
xox Sugary hugs :o)


Wendy, thanks so much. Were you using two strands of floss here? Do you ever satin stitch with perle cotton?
Thank you I am starting to teach myself hand embroidery again. Did samples at school many years ago. We were taught with out doing the outline first, but I think finished work looks better and sits better if you take the time to do this. Looking forward to many more tips. Thanks Vicki
I haven’t Susan no…..but I’m up for anything!
Excellent Vicki…..glad to motivate you……hope it’s helped and yes, it does sit better with the stitching around the shape beforehand, I agree. :o)