Hi everyone! Sara here again, from Made by Sara blog. Have you studied your lesson on how to sew with knits? You can find it here just in case you missed it! I hope you have your knit materials ready because we are about to sew some cute baby/toddler knit pants!

I wish I could teach you how to draft patterns from scratch but I don’t feel I can do it properly on a blog post. It’s easier for me to explain things in person, on a table, with paper, pencil and a ruler. I love live sewing classes!
Since that is not possible here I am teaching you today how to draft some baby & toddler knit pants (or leggings) from an existing pair! It’s really easy!
Making Baby & Toddler Knit Pants
Materials
- An existing pair of knit pants or leggings that fits the intended recipient
- Half yard of knit (Jersey or interlock with at least 20% of stretch)
- Half yard of knit ribbing
- Jersey needle and 100% polyester thread
- craft or tracing paper, pencil, ruler
This is a perfect project to use up all those knit scraps and to upcycle all those old t-shirts and sweaters!
Leg piece
Let’s make the main leg piece!

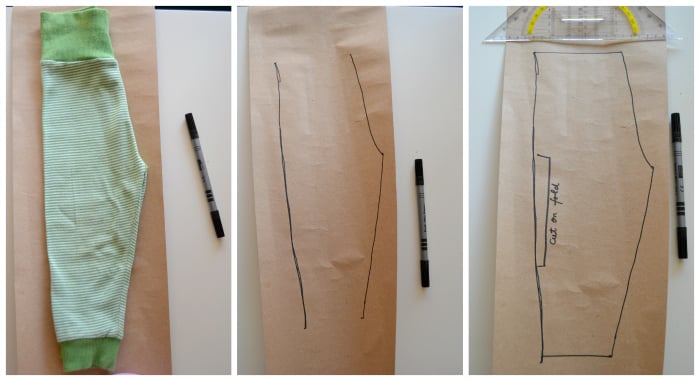
Fold your pants in half along the crotch. Place on top of the tracing paper. Trace all around the leg part only (do not trace the waistband and the leg cuffs).
Cut the paper along the lines you’ve traced. You now have a pattern piece for the legs. Note: The pattern piece does not include the seam allowance (S.A.). Personally I am used to add it directly when cutting the fabric, but if you rather include it in the pattern piece you need to trace the leg part and then trace a second parallel line all around at 3/8” (you can use your preferred S.A. of course).

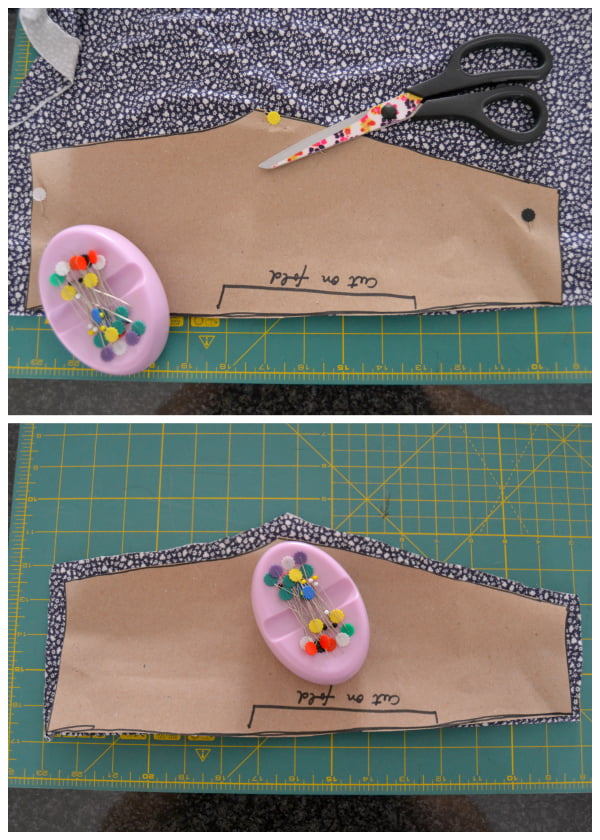
Place your leg pattern piece on your knit, the straight side matching the folded edge. Cut twice (you need two knit pieces). Don’t forget to add the S.A. if you didn’t included it on your pattern piece.

Stitch both leg pieces right side together (RST) along the curves (on both front and back), using a narrow zig zag stitch (2 width, 1.5 length) or a stretch stitch. (1, 2)
Rearrange the leg pieces so that the crotch seams are at the center (and not on the sides). (3) Sew all around the inner legs. (4)
Set aside. We will be making the waistband and the leg cuffs now.
Important note:
The pants I am using here are the same at the front and back. That is why I am only drafting one single pattern piece for this tutorial. Take a good look at the pants you chose. Fold them along the back crotch seam to draft the front piece and then fold along the front crotch and match them to the drafted line. If it is different (wider) than you have to draft a back pattern piece as well. You will have 2 pattern pieces and 4 knit pieces to sew. Just sew the two back pieces together at the curve, and then the two front pieces together at the crotch. Sew along the sides and then along the inner legs.
Also, although front and back may be the same, in some cases you will have a side seam on the legs. Being that the case you can either make 2 pattern pieces for the legs or just ignore it.
Waistband and Leg Cuffs
Now let’s make the final steps!

You can make your waistband and cuff pattern pieces the same way we did the leg pattern piece, or you can just measure it with a tape measure. You will have a rectangle piece. Don’t forget to double the length (these pieces are folded in half lengthwise) and to add the seam allowance all around the rectangle.

Start by stitching the short ends together, creating a loop. Press open the seam. Fold in half lengthwise.

Place around the top edge of the legs piece, with the edges together (the folded edge must be pointing to the bottom) and stitch.
Apply these steps now to make the two leg cuffs.
Note: You can stitch the waistband to the leg piece on the round by removing your sewing machine’s movable arm/plate. For the cuffs you will have to sew on the round from the inside or outside, carefully (see picture above).
Finishing the seams: If you have a serger you can sew and neat finish all the seams with it at once. If you don’t own a serger don’t worry! You can leave the seams unfinished (knits don’t fray, so don’t worry) or finish them with a wide zig zag stitch or an overlock stitch on your regular sewing machine.
You’re done!

It was quick & easy, right?
This is a good project for anyone who wants to try knits for the first time. It is also a great gift for babies! We all know how many wet and pooped pants moms have to wash when they have babies and toddlers around… So there isn’t such a thing as too many knit pants on a baby/toddler wardrobe!

Becky Jorgensen is the creative quilter behind Patchwork Posse, the Patchwork Planner and her online quilt group Patchworkers Plus. You can find her patterns in books, magazines, and her quilt membership. Gather your quilting supplies, organize your sewing space, explore the process of disappearing quilt blocks, or finish a free quilt pattern. I'll help you use what you have, finish what you start and make your quilting journey fun!
Follow me here: Facebook, Pinterest, YouTube


